Paul Hickey, our Director of Digital Solutions recently took part in a Q&A for Lonely Marketer talking all things digital data with Managing Director, Nelly Berova. Read on for the conversation highlights.
Data strategy: what are the three key types of data?
Nelly Berova: First up, in the context of our discussion on data strategy, can you summarise the different types of data available?
Paul Hickey: There are three types of data available: first party, second party and third party data. First party data refers to a company’s own CRM database; the information that the business knows about their own contacts, with the permissions in place to contact those individuals. Second party data is the same as first party data in that permission has been granted from the individual to make contact; the difference being that this type of data indicates potential use by another company – in this way, a user can understand how their data has been used or has been gained for use by that particular business. Third party data is data belonging to individuals who have given their permission to be contacted, but who do not necessarily have a relationship with the particular business who has acquired their data.
Offline data vs online data
NB: Which is the superior data type, offline or online?
PH: There are of course many different data sources out there and there is often a big question mark around which is better: offline or online data, with different data of course being suited to different uses. At TwentyCi, offline data is our core. We have a breakdown of over 30 million consumer properties within the UK market of which our data tells us a great deal, including but not limited to: the characteristics of the building, the nature of ownership, the demographic make-up of those who live there. This factual information provides us with complete confidence when working with brands. Online data gatherers typically focus more on the understanding of an individual’s intent, which while in theory can be a key moment where conversion is possible, can also potentially refer to fleeting sentiment alone. The best way of using data both offline and online is to combine the approaches together to give you the best opportunity to understand the complete picture.
What are the GDPR implications for using third party data?
NB: How does the legislation of 25 May 2018 change the way we use data?
PH: GDPR has made a significant change to the market place in the way that data is being used. Data permissions must now be obtained under opt-in consent or under legitimate interest, data controls which are much more stringent than they have been before but which signify a positive step to build consumer trust and to provide control. We use legitimate interest as a justification of using data within our platform. This is easier to explain from a user point of view; ultimately the ROI that we have achieved from working with a number of clients has made a positive difference for that given marketing programme. For example, if you are moving from a 2 bedroom flat to a 3 bedroom house, you’re in the market for a bed, you’re in the market potentially for a sofa, for electrical items, potential insurance, and often a mortgage. On this basis people are open to being contacted to understand the nature and the opportunities in the market place. This is a positive way that data itself and data permissions are being used in the market now. Gone are the days of a ‘scatter gun’ approach, of simply hoping that something sticks.
The Optimize Command and Route Caching
The optimize command has various aspects to improve the performance of the Laravel application. The command provides two flags. Firstly, the –force flag can indicate that the compiled class file should be written (by default the compiled class is not written when the application is in debug mode). On the other hand, the –psr flag can be set to indicate that the composer should not create an optimized class map loader (class maps are generally better for performance reasons).
We can write the compiled files cache to the bootstrap/cache/compiled.php cache file. The compiled and written files are in any cache files that meet the following criteria:
- Any files specified in the compile.files configuration entry;
- The files that are specified by any service providers listed in the compile providers configuration entry;
- Some framework files listed in the src/Illuminate/Foundation/Console/Optimize/config.php file.
The following examples demonstrate how to use the optimize command:
# Generate a compiled class file with default options.
artisan optimize
# Generate a compiled class file without optimizing the Composer
# autoload file.
artisan optimize –psr
# Generate a compiled class file on a development or debug machine.
artisan optimize –force
Laravel Route Caching
Using the route cache will drastically decrease the amount of time it takes to register all of your application’s routes. In some cases, your route registration may even be up to 100x faster.
-
Laravel Routing Primer
In config/app.php we see that App\Providers\RouteServiceProvider::class is listed as a default framework provider. App\Providers\RouteServiceProvider::class extends Illuminate\Foundation\Support\Providers\RouteServiceProvider which has its own boot function that looks like this:
public function boot()
{
$this->setRootControllerNamespace();
if ($this->app->routesAreCached()) {
$this->loadCachedRoutes();
} else {
$this->loadRoutes();
$this->app->booted(function () {
$this->app[‘router’]->getRoutes()->refreshNameLookups();
$this->app[‘router’]->getRoutes()->refreshActionLookups();
});
}
}
Once the controller namespace is set, the boot method checks to see if the routes have been cached. So, let’s explore what happens both with and without the route cache.
Without Route Cache
If your routes are not cached, $this->loadRoutes() ends up calling the app/Providers/RouteServiceProvider.php map() function which maps Api routes (mapApiRoutes) and Web routes (mapWebRoutes). For the sake of simplicity, comment out all routes in the routes/api.php file so we will only be dealing with routes in the routes/web.php file. mapWebRoutes pulls in everything from routes/web.php. On the other hand, for each entry in routes/web.php Laravel parses the entry and converts it into an Illuminate/Routing/Route object. Moreover, this conversion actually requires alias resolving, determining middleware and route grouping, resolving the correct controller action and identifying the HTTP action and parameter inputs. Finally, this is done for all routes which are grouped into a final Illuminate/Routing/RouteCollection.
Lastly, $this->app[‘router’]->getRoutes()->refreshNameLookups() and $this->app[‘router’]->getRoutes()->refreshActionLookups() run once the app finishes booting. These are called on the Illuminate/Routing/RouteCollection in case any new route names were generated or if any actions were overwritten by new controllers. This could be caused by other service providers later in the boot cycle.
With Route Cache
When you run PHP artisan routes: cache, an instance of Illuminate/Routing/RouteCollection is built. After being encoded, the serialized output is written to bootstrap/cache/routes.php.
Here we will decode and unserialize the RouteCollection instance that holds all of the route information for an application. This allows us to instantaneously load the entire route map into the router.
In other words, our application no longer has to parse and convert entries from the routes files into Illuminate/Routing/Route objects in an Illuminate/Routing/RouteCollection. Likewise, the application also does not call refreshNameLookups or refreshActionLookups. Thus, be sure to always regenerate your route cache if you add/modify routes or add service providers that will add/modify your routes.
-
Methodology
Let’s measure how much time Laravel takes to register routes by instrumenting Illuminate/Foundation/Support/Providers/RouteServiceProvider.php. In this case, we can use PHP’s microtime() to measure the time it takes to run blocks of code.
In Illuminate\Foundation\Support\Providers\RouteServiceProvider.php, let’s modify the boot() function to capture time like this:
public function boot()
{
$this->setRootControllerNamespace();
// Initialize a global route load time variable
$this->app->routeLoadTime = 0;
if ($this->app->routesAreCached()) {
$time_start = microtime(true);
$this->loadCachedRoutes();
$this->app->routeLoadTime += microtime(true) – $time_start;
} else {
$time_start = microtime(true);
$this->loadRoutes();
$this->app->routeLoadTime += microtime(true) – $time_start;
$this->app->booted(function () {
$time_start = microtime(true);
$this->app[‘router’]->getRoutes()->refreshNameLookups();
$this->app[‘router’]->getRoutes()->refreshActionLookups();
$this->app->routeLoadTime += microtime(true) – $time_start;
});
}
$this->app->booted(function() {
dd($this->app->routeLoadTime);
});
}
If routes are not cached, we immediately measure the time of loadRoutes(). When the app is booted, we add the time it takes to run refreshNameLookups and refreshActionLookups. Lastly, we dump out the total captured time and kill the request.
If routes are cached, we measure the time it takes to call loadCachedRoutes(). However, notice that loadCachedRoutes() defers its work until the app is booted.
protected function loadCachedRoutes()
{
$this->app->booted(function () {
require $this->app->getCachedRoutesPath();
});
}
Let’s modify loadCachedRoutes to capture that time:
protected function loadCachedRoutes()
{
$this->app->booted(function () {
$time_start = microtime(true);
require $this->app->getCachedRoutesPath();
$this->app->routeLoadTime += microtime(true) – $time_start;
});
}
Now when we use the cache we are measuring both the time to register the booted callback and the time it takes to run that callback (require $this->app->getCachedRoutesPath();), which turns the cached routes back into a Illuminate/Routing/RouteCollection. At last, we dd() the output.
Hung Nguyen
In this day and age, people are consuming content on mobile phones more than ever and experiencing a low tolerance for slow loading website. A new tech stack, JAMstack has shown the potential for ease of the development process and needs satisfaction from the user perspective. It seems like dynamic website architecture will be the de facto for web development. However, when using them developers and users might face potential problems with security, speed, and performance. That’s why JAMstack can be your next web development architecture.
When Sir Tim Berners-Lee created the first ever website, the World Wide Web project, he did not just create a standard for accessing information over the internet but also presented other technologies to go along with it namely HTTP and HTML. As demand for the web kept increasing both in quantity and quality, people increasingly invented and form CSS and JavaScript by HTML, a triad of cornerstone technologies for the World Wide Web.
The first website was only in HTML, pretty much static and vanilla plain at that time, but its creation has been the centre of the digital age. People don’t just consume the information but also participate in creating new content. Dynamic websites in the ’00s, powered mainly by the LAMP stack and CMS’ such as WordPress, Drupal and Joomla had a major contribution in changing how everyone uses the internet. What’s better than sharing your own content to virtually the whole world (and possibly gaining money from THOSE content, too)?
JAMstack definition
The definition is pretty simple, J-A-M as in JAMstack includes three key concepts:
- JavaScript: Dynamic programming during the request/response cycle is handled by JavaScript and running entirely on the client.
- APIs: All server-side functions and database actions are abstracted into reusable APIs, accessed over HTTPS with JS.
- Markup: Build/deploy time should generate/prebuild templated markup via a site generator for content sites, or build tools for web apps.
The definition itself, while indicates the criteria, is also pretty loose about how you can implement to match them. For example, you can use vanilla JavaScript or any JS framework in your site. Any kind of SaaS, third-party services or custom-built can be your API solution. The JAMstack is not about specific technologies, focusing on delivering blazing fast websites and providing better developer experience.
A JAMstack project has several best practices, which are also defining properties of this tech stack:
- Entire site/app on a CDN: The fact that JAMstack builds artefact just contains static files make it a perfect fit for distributedly serving without having to rely on a single server. Using CDNs has the unparallel advantages of both speed and performance for everyone no matter their location.
- Everything lives in Git: The entire project can be cloned and run locally without sophisticated setup. The build files can also be stored on Git making version control easier.
- Modern build tools: Taking advantage of modern build tools that enable you to use future web standard features that are still compatible with the current implementation
- Automated builds: Content changes will be triggered after each build. Automating this process guarantees the correctness of the build and also save a lot of other problems.
- Atomic deploys: To avoid inconsistent state due to many changed and uploaded files in the build process, you can use a system that only allows changes go live after all changed files are uploaded.
- Instant cache invalidation: With the power of CDN, instant cache purge is easy. You save a lot of time comparing to the traditional caching solution from dynamic website architecture.
Compare between traditional and JAMstack workflow
Here’s a quick comparison between the two approaches. The picture shows a simplified version of what under the hood.
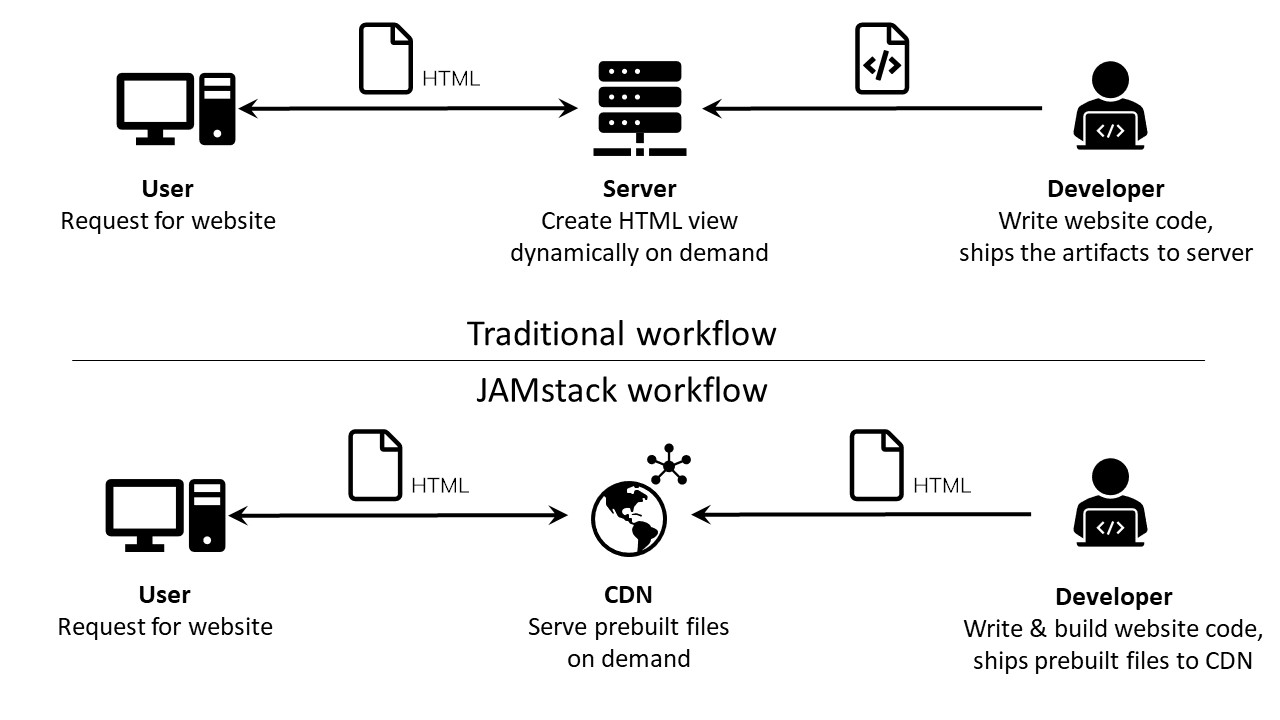 Traditional workflow
- When coupling tightly between building and hosting, we deploy the back-end and front-end code to the same server and will serve requests from there.
- Every time a request is initiated and hit the server, the files will be processed and potentially served along with a reaction chain (database, back-end, front-end, server, caching, browser).
- We push code update to the server via different means. Therefore, we need to maintain databases along with supplemental services on the server instance.
- We push content updates via traditional CMS like WordPress, Drupal, et cetera.
JAMstack workflow
- Building and hosting process is decoupled. Hence, developers can build the project locally or using continuous deployment solutions and deploy the built files to CDN.
- Every time a request is initiated, the static file is served from CDN to the user without server processing.
- Core update is pushed using Git and the site is rebuilt using modern build tools like static sites generators.
- You update content via Git or content CMS like Contentful, Netlify CMS.
Benefits
For developers
JAMstack benefits can break down as four main categories: performance, security, scaling & developer experience.
- Better performance: We create webpage at build time, hence there is virtually no compilation on the client. It also reduces the number of requests for extra dependencies as we can combine those into a single bundle. In addition, serving via CDN always brings the benefit of speed and minimizing the time to the first byte.
- Higher security: The delegation of server-side processes and database operation reduced the attack surface greatly. For the reason that the received files are static by nature, they also remove many points of failures and security exploits that popular tech stack/CMS encounter frequently.
- Cheaper, easier scaling: Because the server files are static, we just concern targeted regions and serving volumes. As a result, scaling with CDN is easier.
- Better developer experience: The reduction of bloat, easier maintenance and flexible workflow really help with development and debugging. With the help of headless CMS, it’s easier for content management without having to create a dedicatedly separate site.
For clients
- More traffics: JAMstack powered pages to be static and serve to end-users ASAP, which will increase the user experience and is an important factor in SEO. With Google enabling mobile-first indexing, the lightweight, static nature of JAMstack websites will bring in better ranking, increasing site traffics, helping with the sale conversion and audience impression.
- Simplified management, reduce cost: As JAMstack architecture is fairly simple, the site is simpler, more secure and reliable. By mean of replacing the web server, databases, plugins, maintenance time with static files hosting on CDN and APIs usage, it makes the cost more predictable and easier to work with.
With a focus on users’ and developers’ experience, the JAMstack has gained a lot of traction over the recent years.
 Source: JAMstack interest on Google Trends
Common FAQs
1. Is JAMstack only for creating blog sites? Does it handle dynamic features?
Yes, sites created with JAMstack can handle dynamic features totally fine. Before the term JAMstack appeared, developers had already had the ability to create blog sites with static pages. JAMstack excels in creating static pages, which people usually associate with static blogs, landing pages that are not too dynamic by nature. However, that doesn’t mean JAMstack applicable field stops there. By the rising of third-party services, SaaS, you can integrate the dynamic features into your site easily. Need search functionality? Try Algolia, Google Custom Search. Need forms? Try TypeForm, Google Forms, Netlify. Need shopping carts? Have a look at Snipcard, Shopify, Gumroad.
2. I don’t want to depend on external services for dynamic features
That’s a legitimate concern. Custom built API is an alternative and valid way to integrate dynamic features given you have the budget to do so. If your concern is due to the external services, please try to have an open mind. You’re probably already using Google Maps for map feature or 3rd party plugins for SEO, comment, etc. Having other dynamic features integrated with external services is just similar to those.
3. How can I manage user permission and editor roles?
You can leverage headless and decoupled traditional CMS.
4. Can JAMstack be the default development solution?
The beauty of web development is that there’s no “the only correct way” to do one goal and JAMstack is not the exception. If you and your team already have the future-proof, battle-tested solution, you should keep continuing to do so. Modern web stack can be performant, easy to work with and scale very well. Web traffic is like population distribution where most of the traffic volume only goes to a small per cent of the sites out there, leave the rest with low traffic. JAMstack fits more with those remaining (not to say that sites built with this stack can’t become bigger).
5. What’re the limitations of JAMstack?
- Steep learning curve: It requires developers to have a strong foundation with JS and toolings. By way of the default setup, JAMstack can be troublesome for a non-tech person to interact with.
- New features depend on third-party solutions: Any dynamic features may require client-side solutions, which can be hard for integration, development and maintenance. Consequently, third-party solutions can pose security risks, create technical limitation, have unintended cost and affect site stability if the external service goes down.
How to stay up-to-date?
The JAMstack has evolved quickly over the recent years. Now, it is is not just for static blogs anymore but also capable of creating a website with highly dynamic components. This stack and its ecosystem certainly have the potential to evolve furthermore, to satisfy the needs of building fast, resilient webpages. It is easy to get lost on how to start and stay updated with the changes of JAMstack so here are a few useful resources that you can keep an eye on:
- JAMstack.org – The official website for JAMstack technology. The site’s source code is an example using this tech stack.
- Netlify’s blog
- The New Dynamic – Directory of Tools and Services
- StaticGen – The curated list of SSGs
- HeadlessCMS – The curated list of headless CMS
In addition, you can always join in discussions using hashtag #JAMstack on Twitter, chat on Gitter or participate in nearby JAMstack conferences to have a deeper understanding of how this tech stack is being used.
Credits: Header image created by Valeria_Aksakova / Freepik
Thanh Phan
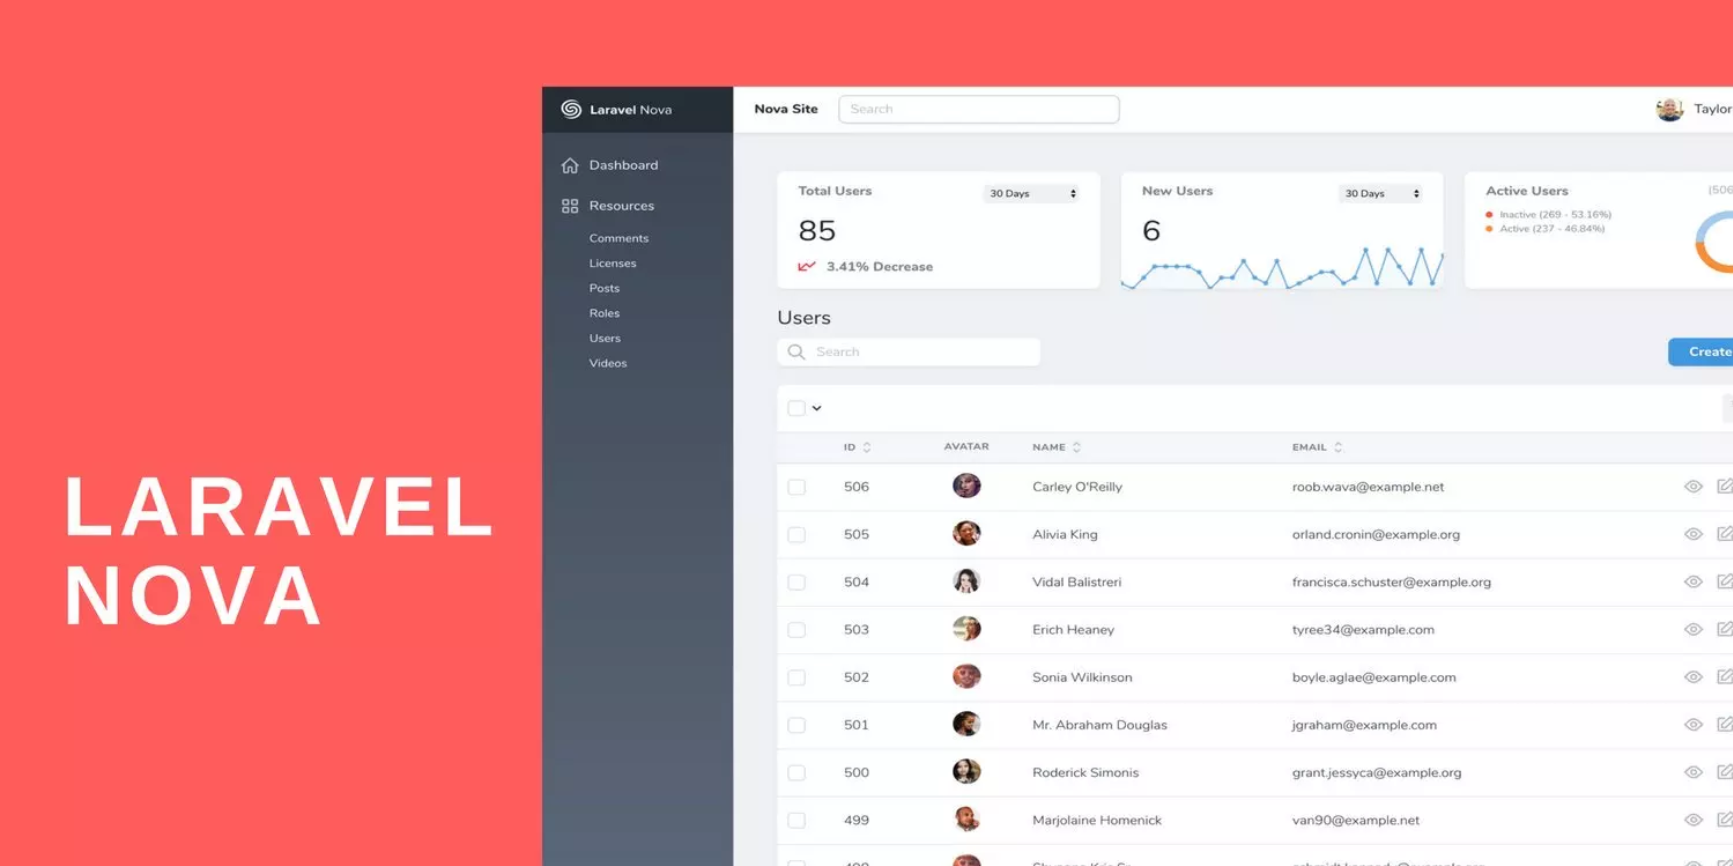
Sometimes you need a simple admin panel to download reports, send emails, search data, review graphs, or safely make database changes. If you have a Laravel web-app or website that needs light content management or light customer relationship management, Nova – the simple Admin Panel Content Management System is a great solution for you.
What is Laravel Nova?
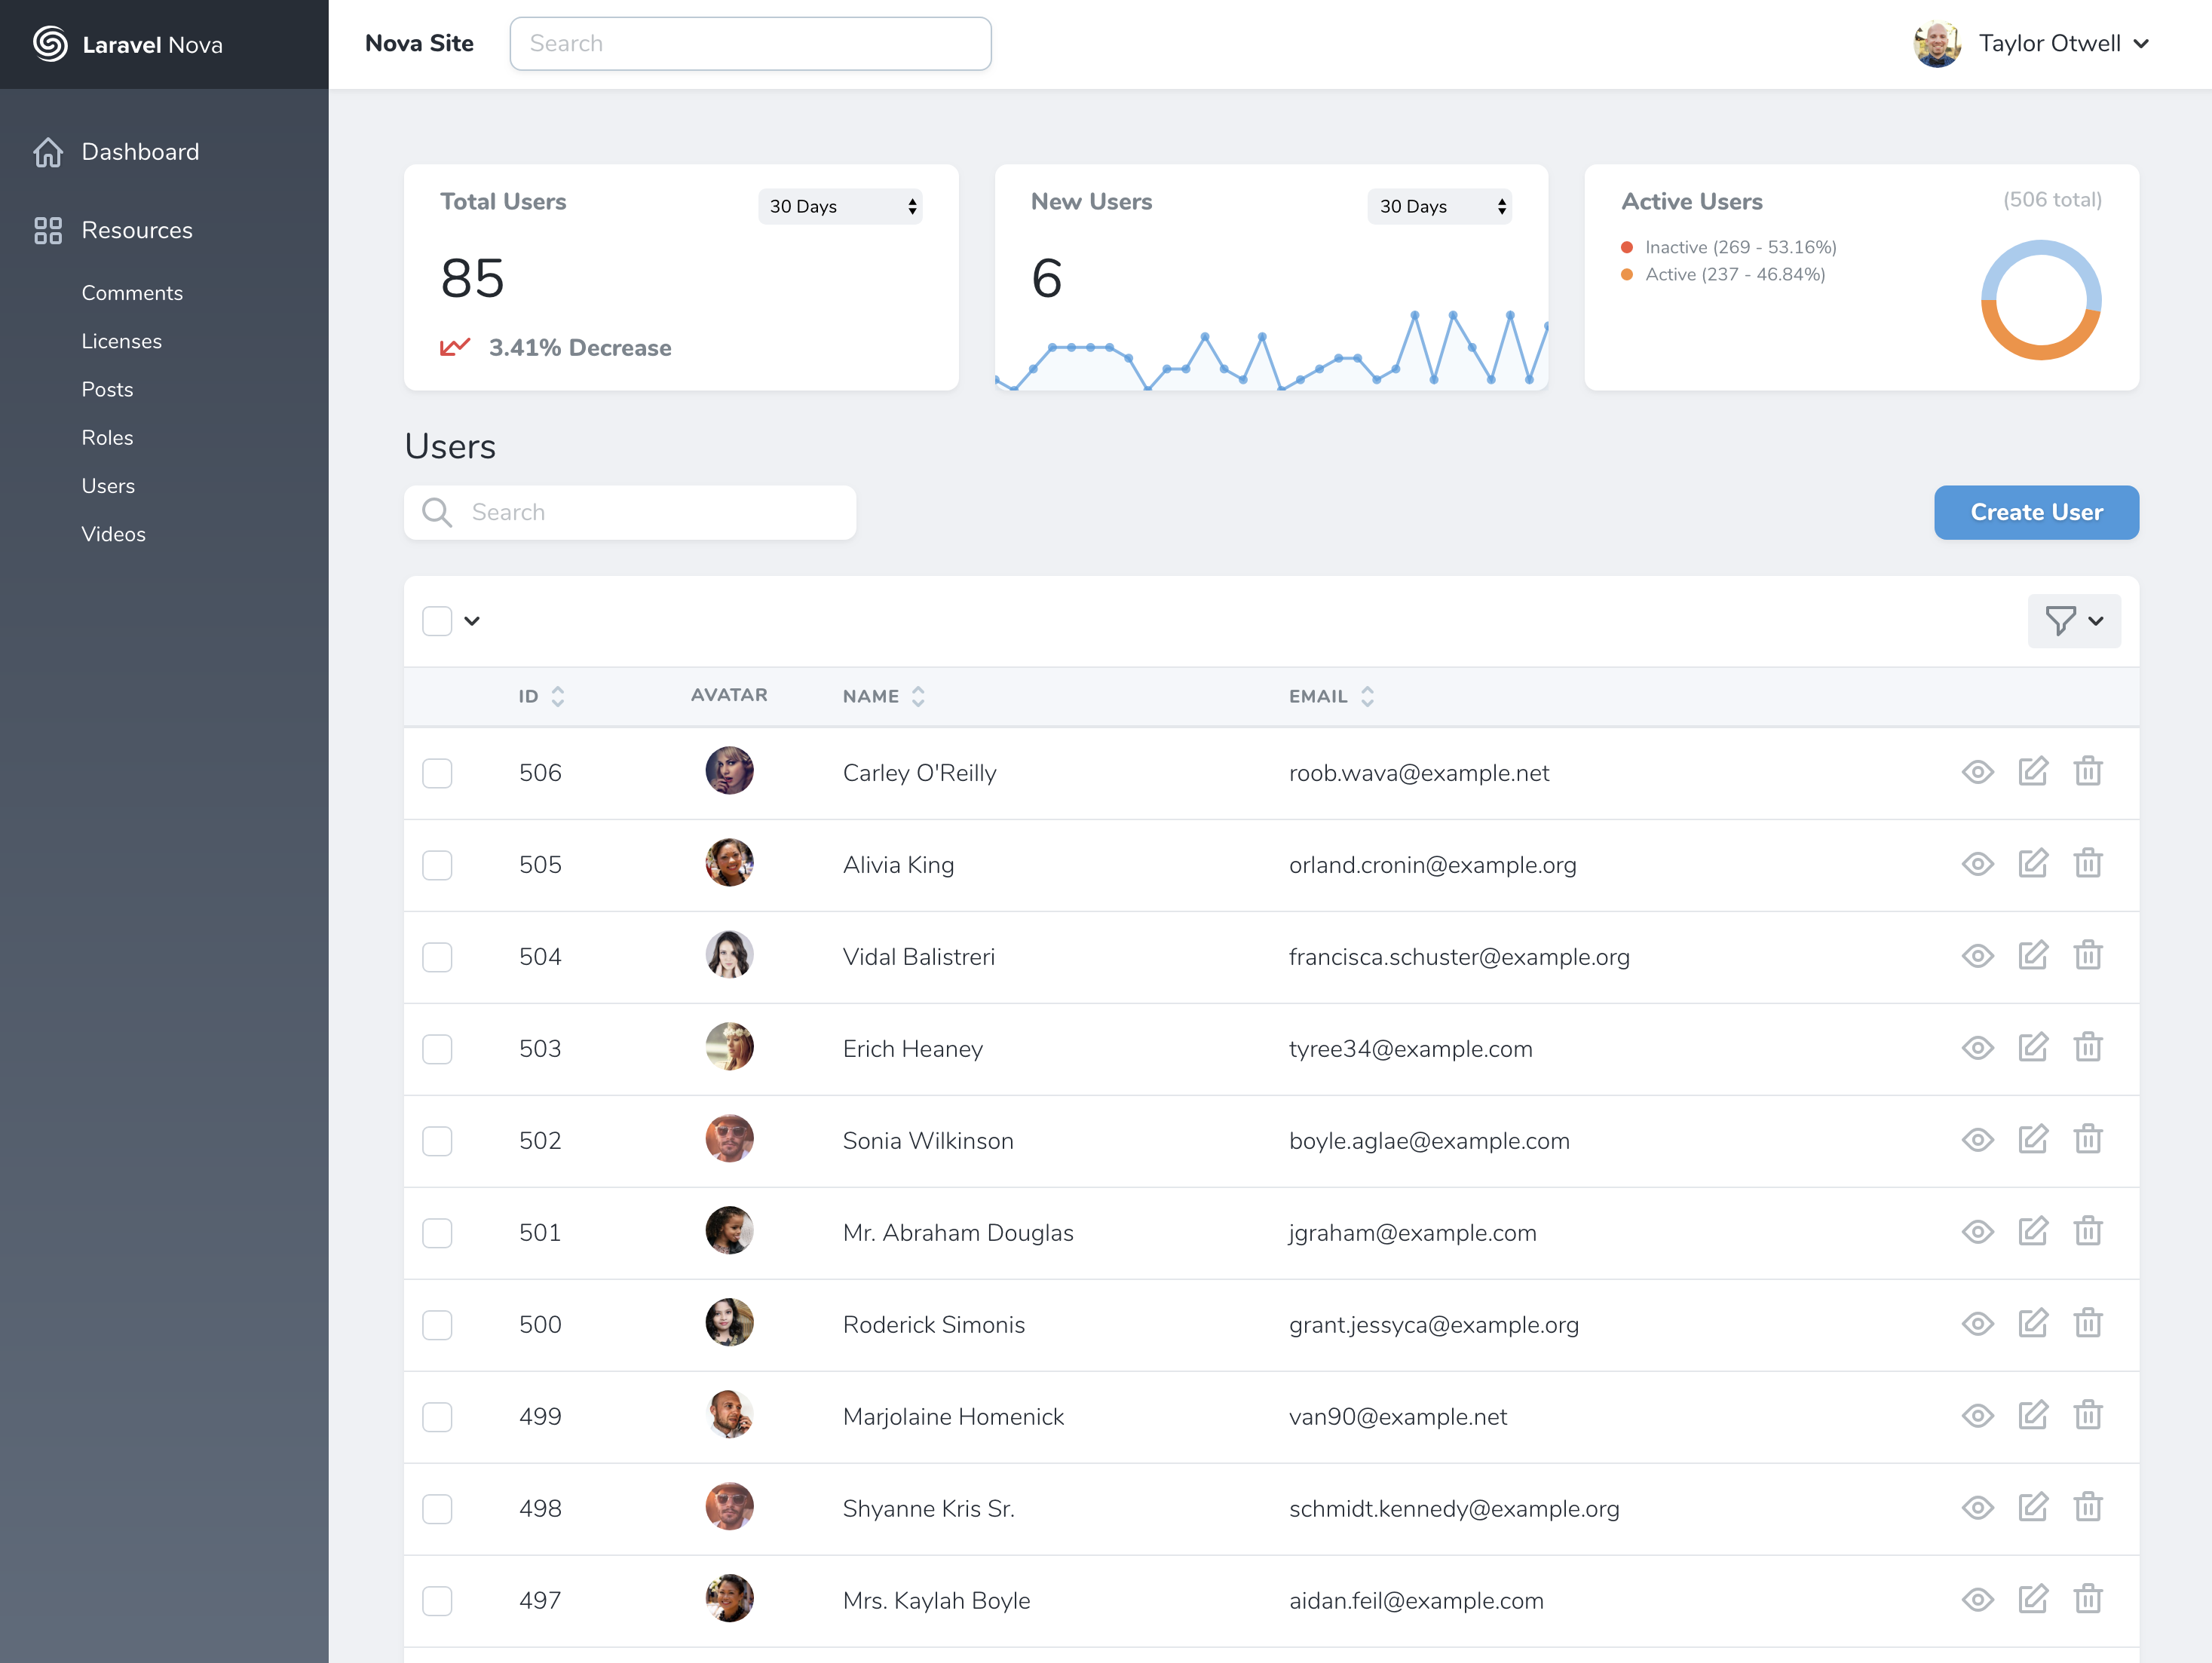
Laravel Nova is the admin panel for Laravel that was first introduced at Laracon Us 2018 by Taylor Otwell. It’s beautiful and easy to work with. Nova allows you to easily manage resources, create your own filters or actions, and many things cool stuff.
There’s so much information about the detail of Nova on the documentation website you can learn more about it here Laravel Nova Documentation.
Although Nova is not free. A license for a solo developer with annual revenue less than $20k is $99/site, and a pro license is $199/site. Head over to nova.laravel.com to register and purchase a license.
How does Laravel Nova work?
Nova is a package you pull in with Composer that makes it easy to attach “Resources” to your Eloquent models. Imagine you have a list of users in your users table with a User Eloquent model, you’re now going to create a User Resource class which attaches to your model. The moment you create a Resource, it’s registered into Nova and gets added as one of the editable chunks of the admin panel.
Each resource will available in the left sidebar. By default, every resource gets basic CRUD treatment (as above example): list users, create user, edit or delete user.
Defining a Resource in Laravel Nova
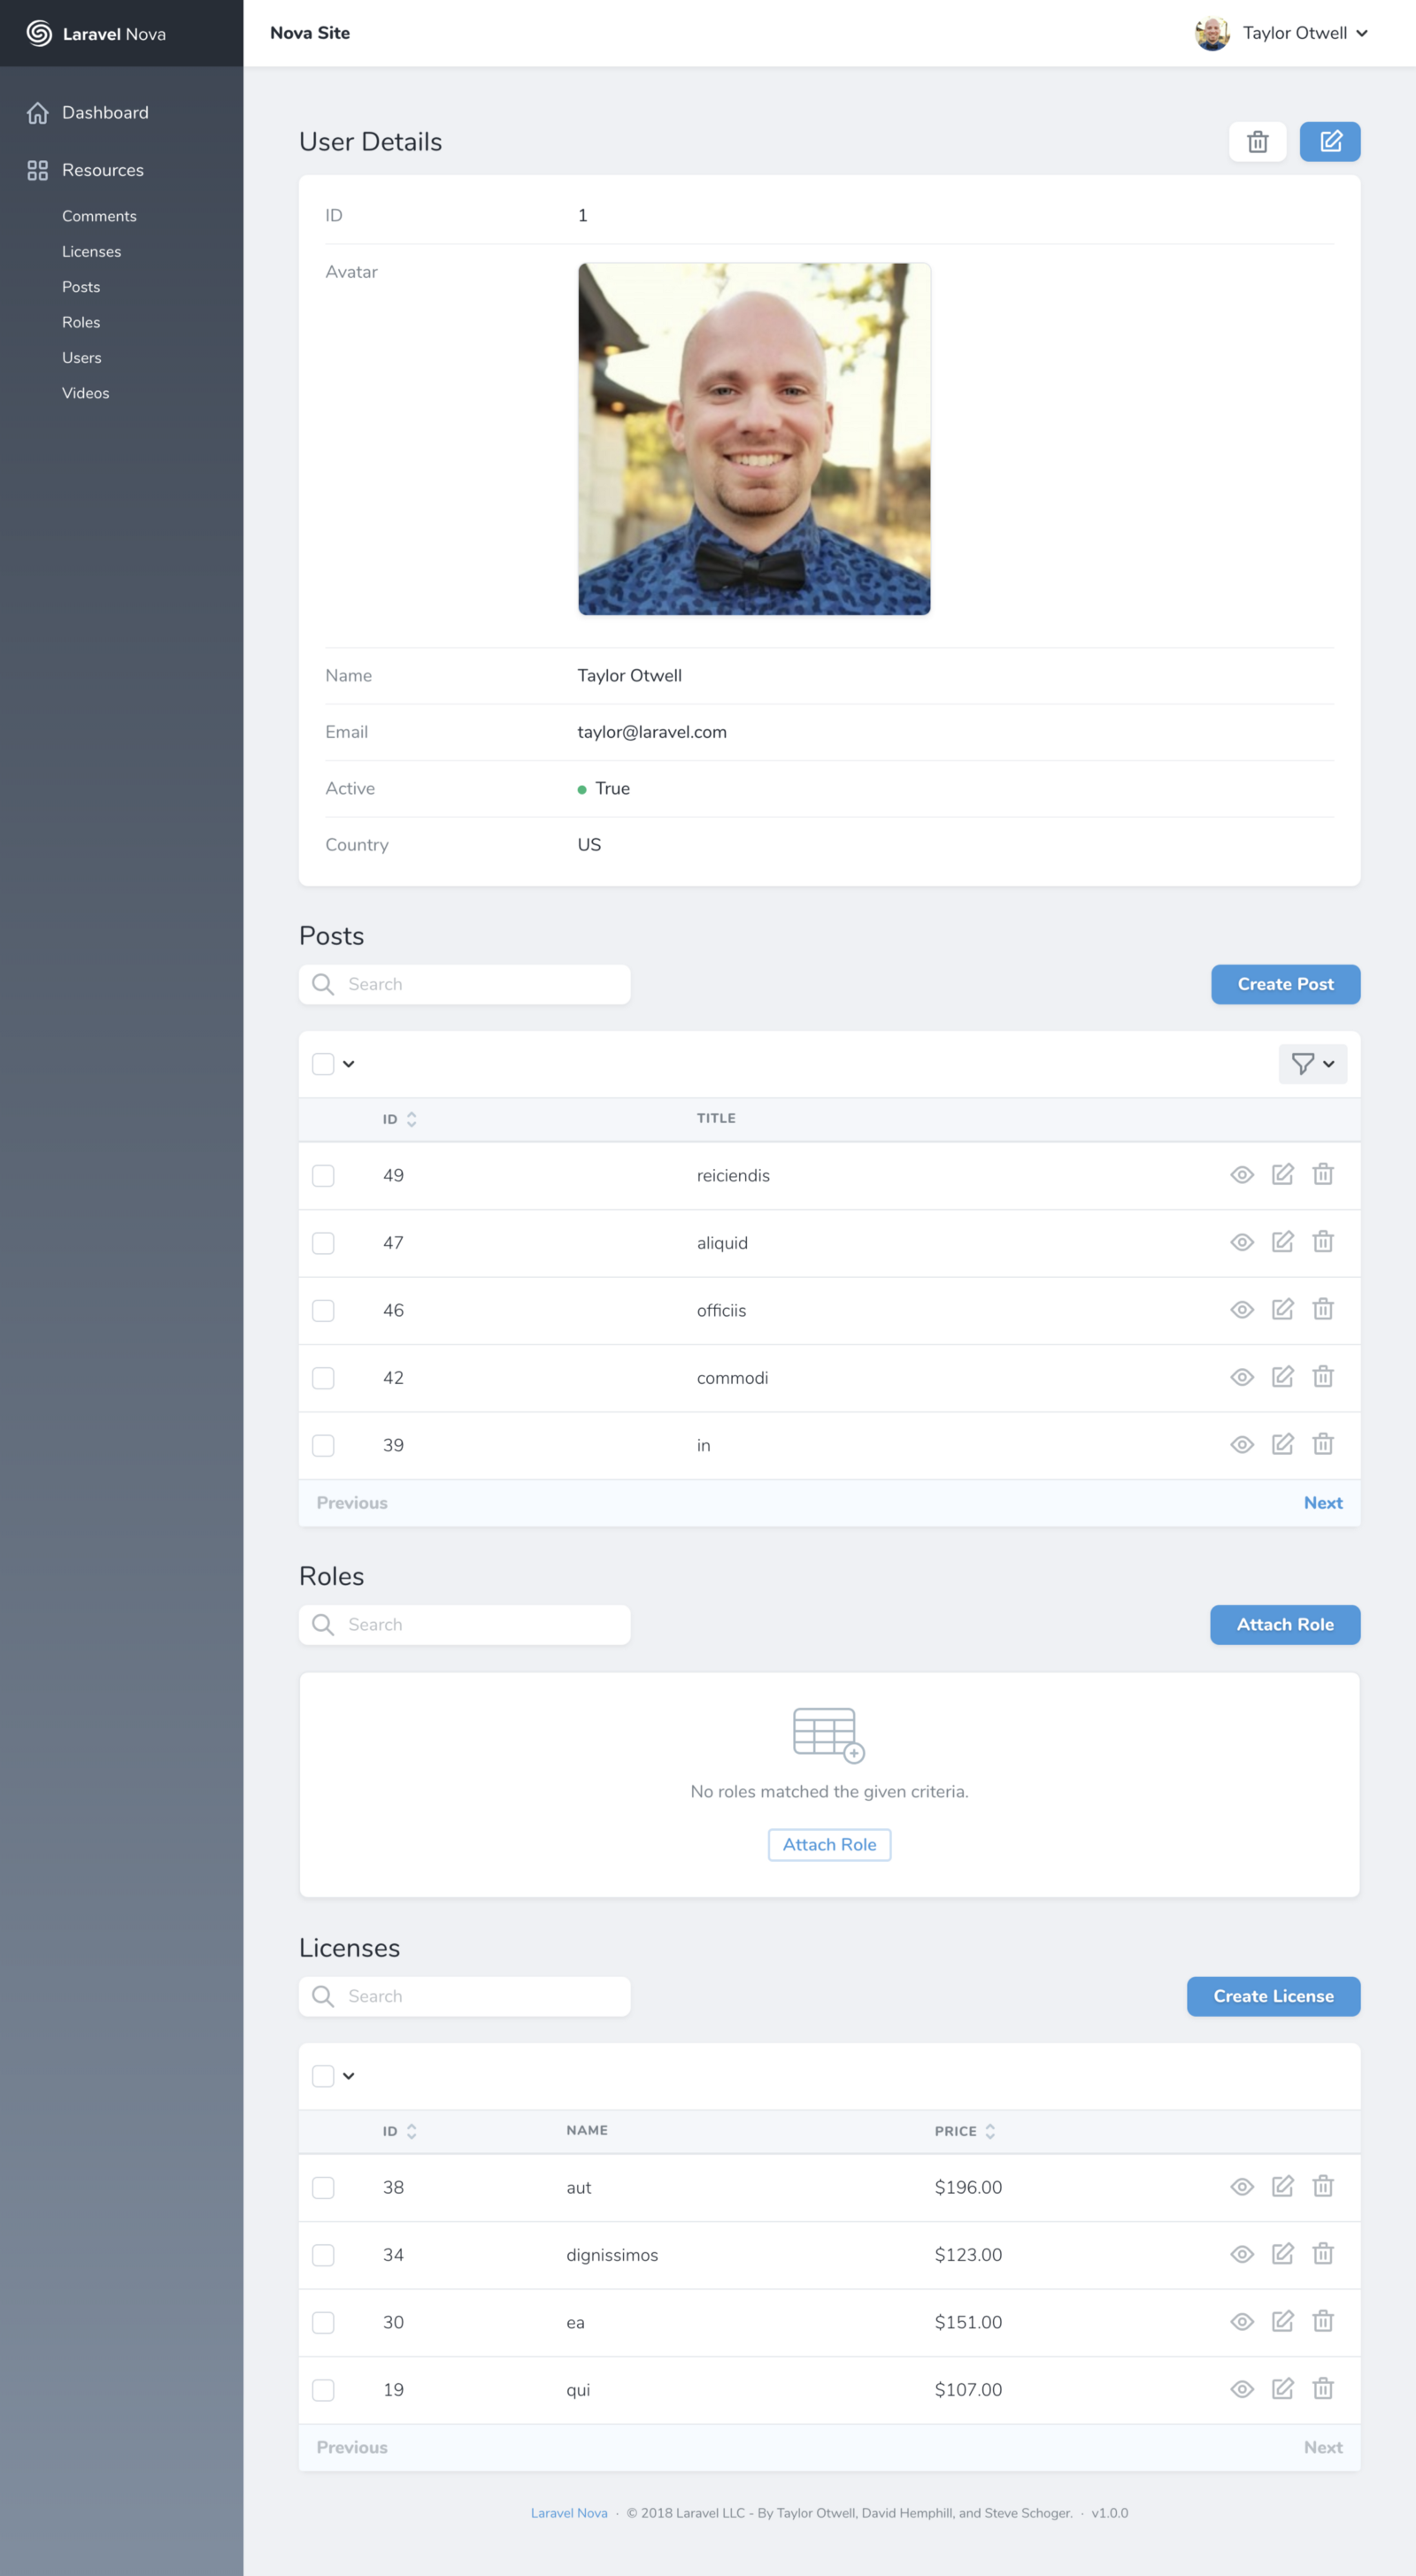
Each resource has a list page, a detail page, and an edit/create page. Here’s a sample detail page:
Work with fields
Each resource contains a fields method. Nova ship with a variety of fields out of the box, including fields for text Inputs, Booleans, Dates, File Upload and more.
Actions and Filters
Actions in Nova
Nova actions allow you to perform custom tasks on one or more Eloquent models. For example, you might write an action that sends an email to a user containing account data they have requested. Or, you might write an action to transfer a group of records to another user.
Once an action has been attached to a resource definition, you may initiate it from the resource’s index or detail screens:
Filters in Nova
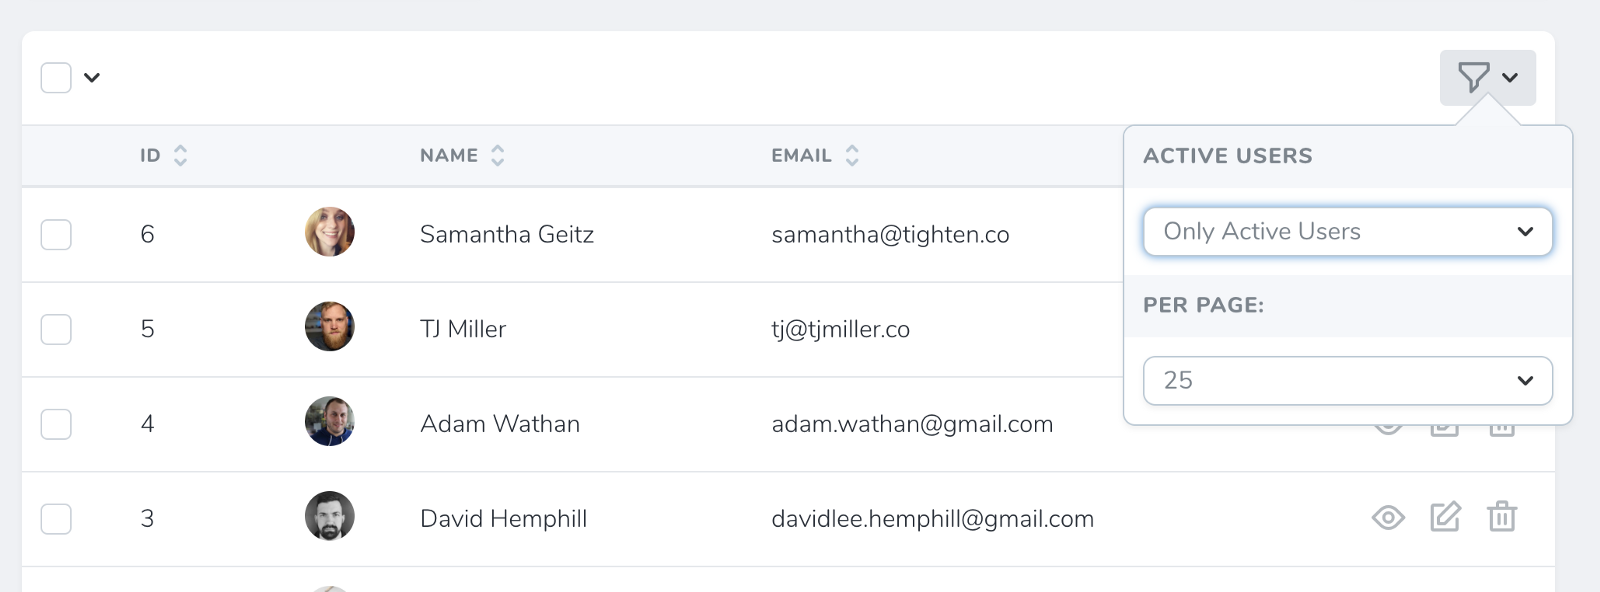
Filters are similar to actions, they’ll show up in a dropdown on the index page and let you show “only items that match this filter”. Just like this:
Lense
While similar to filters, Laravel Nova lense allows you to fully customize the underlying resource Eloquent query. For example, you may have a list of user and want to sorted by their revenue. To do that, you have to join to additional tables and perform aggregate functions within the query. If it sound complicated, fear not – Nova lense got your back.
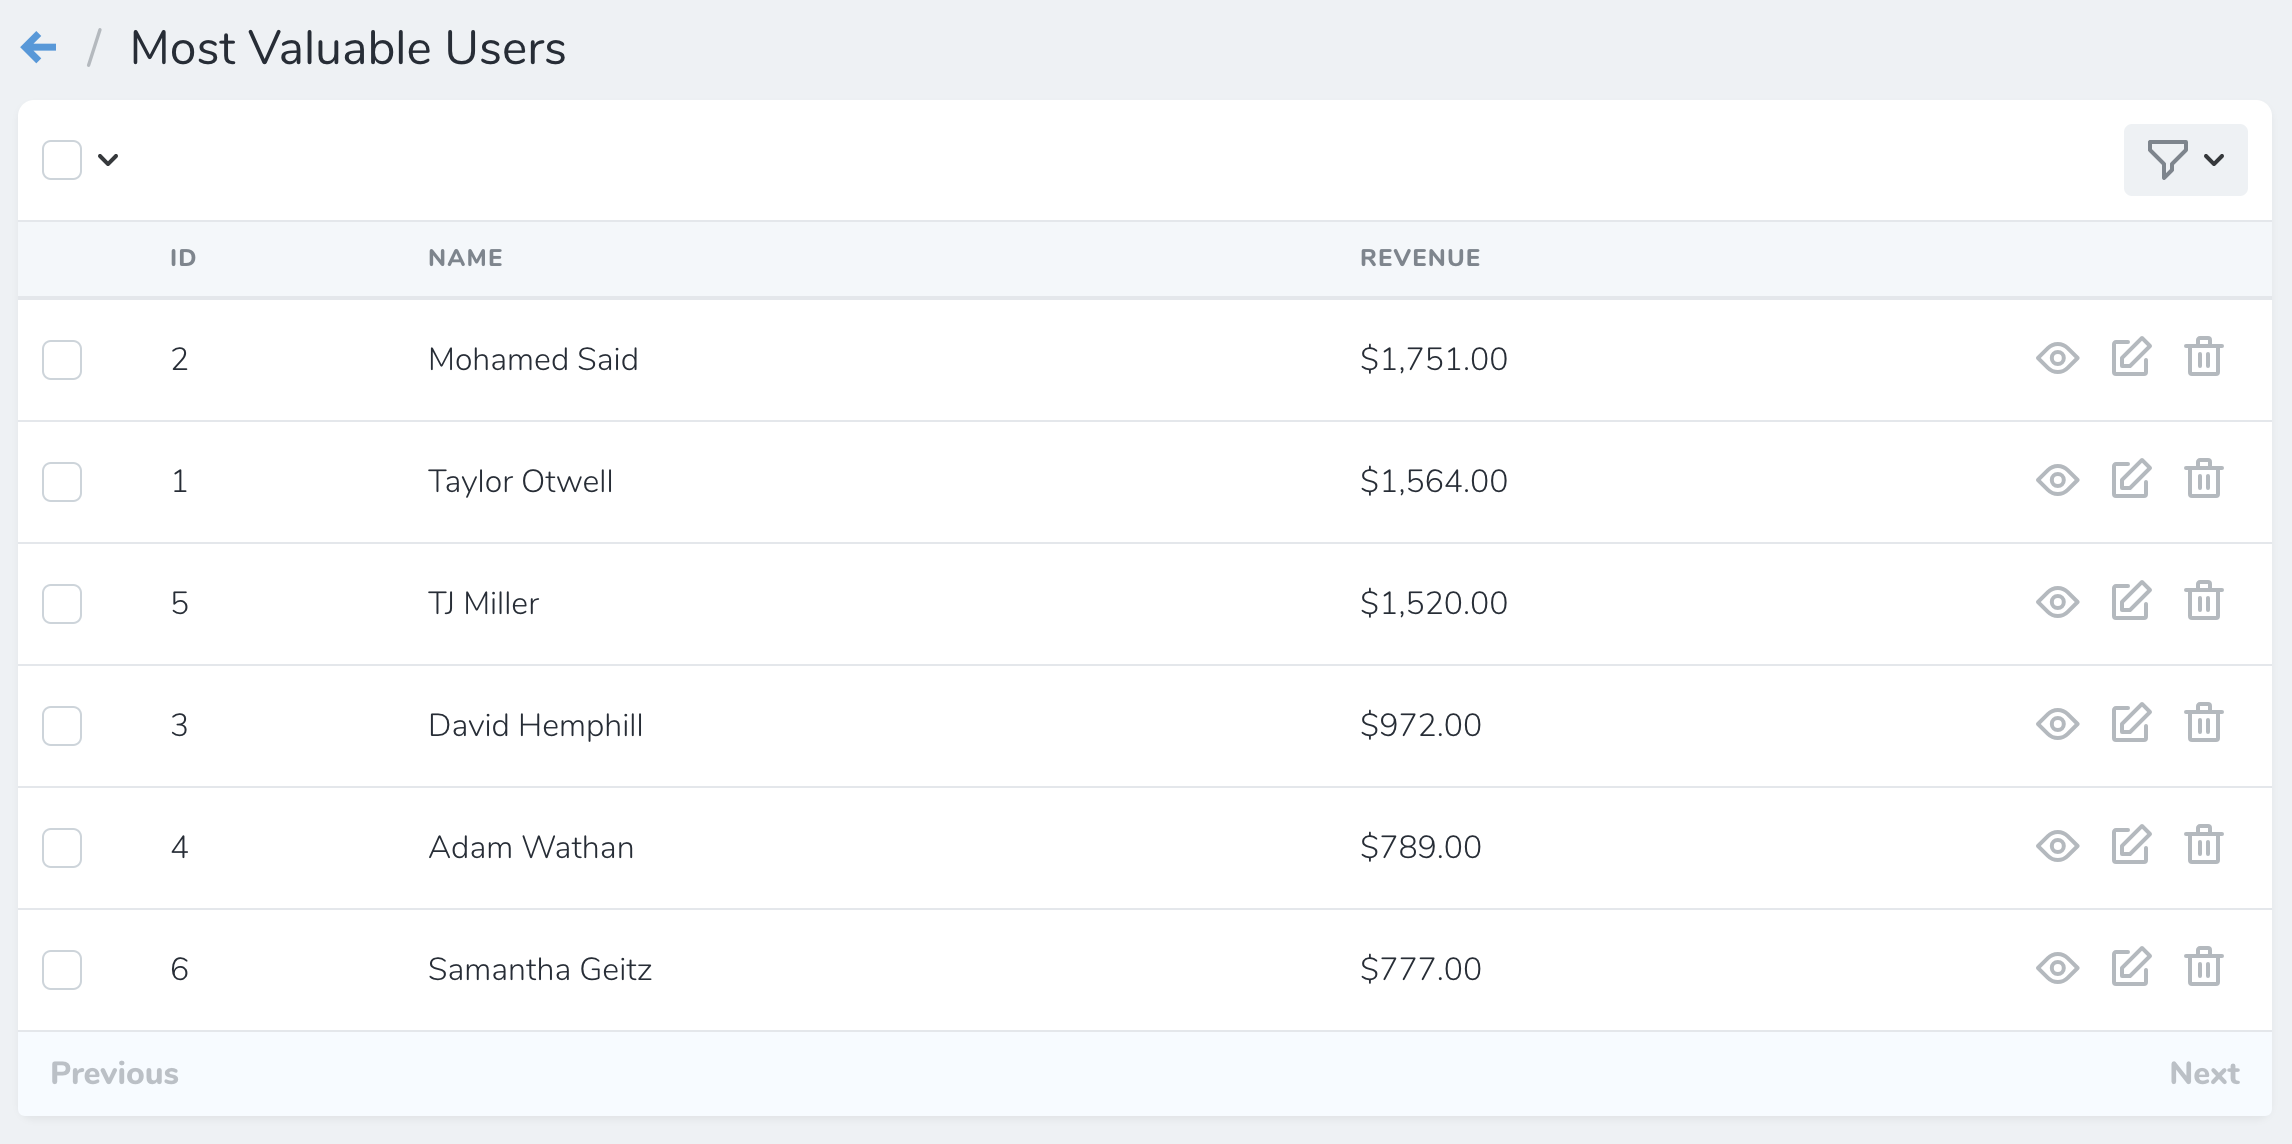
You can also have fields(), filters() and actions() methods on your Lens class, just like on resources.
Metrics
Value Metrics
Value metrics display a single value and, if desired, it change compared to a previous time interval. For example, a value metric might display the total number of users created in the last thirty days compared with the previous thirty days:
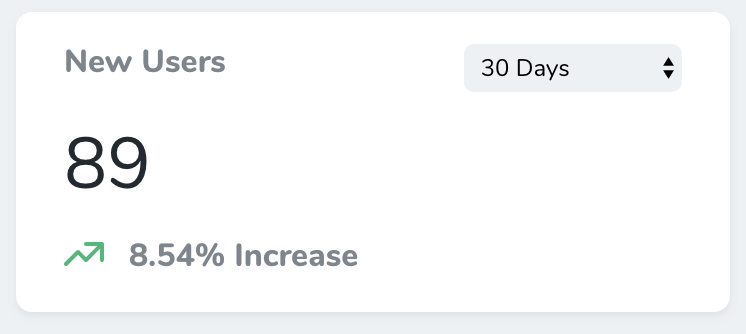
Trend Metrics
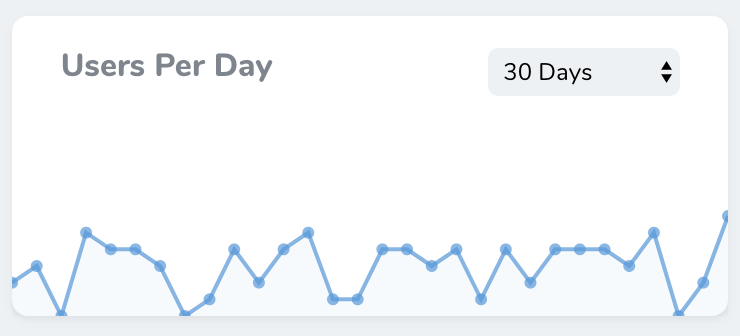
Trend metrics display values over time via a line chart. For example, a trend metric might display the number of new users created per day over the previous thirty days:
Partition Metrics
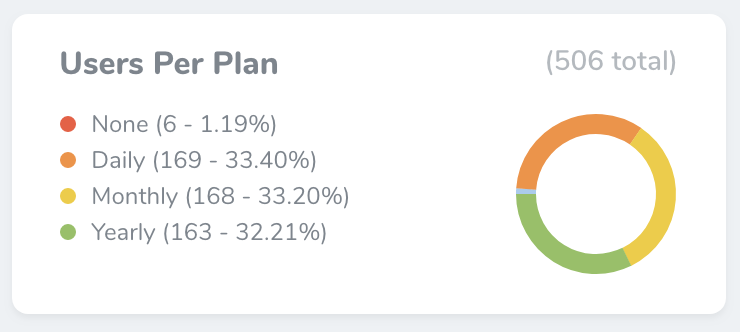
Partition metrics displays a pie chart of values. For example, partition metric might display the total number of users for each billing plan offered by your web-app:
Search in Nova
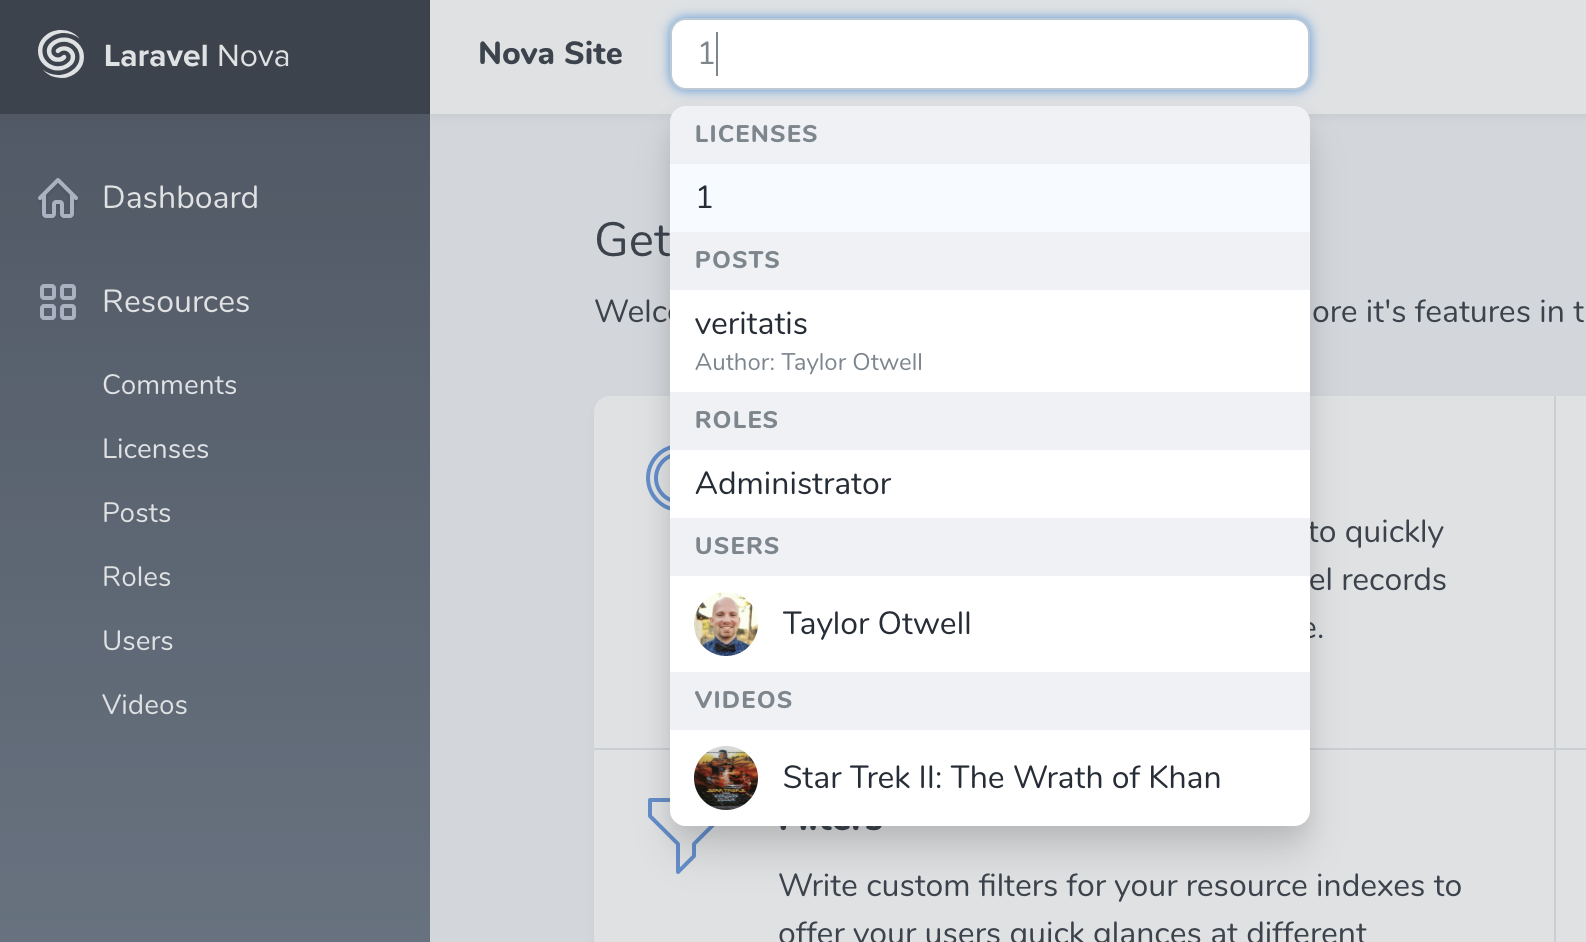
All Resources can be searched from their list pages. You can set the globallySearchable property to true either on your base Nova Resource or just on individual Resources, and Nova will show a global search box up in the top nav-bar. Type in there anything you want to search then you will get the results across all of the globally searchable Resources.
Summary
As you can see, Laravel Nova is very easy to setup and manage the content in your application. I think in the future, Nova will have the kind of impact on Laravel development that Laravel had on PHP web development.
Huy Le
Software testing is a crucial part of building an IT product. Manual Testing is still important for effective software delivery. However, for foolproof results, you cannot survive without complementing it with automation testing. Hybrid Test Automation is one of biggest trends in the software industry these days.
Perhaps, you may also be vying to implement automation testing, but to no avail. The reason is pressure of quick and continuous applications releases, busy schedules or non-availability of internal skilled resources. So, manual testing has been no cakewalk for you, especially, while you’ve been running projects using Agile Methodology where you must be testing stories of particular sprint at least 3-4 times before releasing the sprint to the client.
The fact is fixing bugs detected early is a lot easier and cheaper than finding them later in the development process. This means creating automated tests for checking each added feature as early as possible. However, knowing what and when to automate is very important and there are some best practices for automated testing.
Today, I’m going to show you a tool using Automation Framework that Can Eliminate Manual Testing Woes. With AI-Powered Test Automation Dashboard, this Framework is based on the hybrid model that applies the best features of Keyword-Driven Framework, and Data-Driven Testing Framework.

With this Framework, you can create simple functional tests in the earlier stages of development, test the application, piece by piece, and improve your automated testing success rate without having to learn a scripting language. This can extremely improve the test process and reduce cost. The tester can automate any web and mobile applications by writing test scripts in Excel using the simple English language with little training.
The major difference between the Keyword Driven Framework and others is the use of “Keywords”. Based on the usage of Keywords, you can broadly classify the framework in 2 different types:
Type 1: Keywords are mapped to the lowest level operation on an object.
Type 2: Keywords are mapped to a function or action which contains a collection of statements.

In this article, I will cover the first type in detail. We will see how you can create a keyword driven framework where most of the keywords are mapped to the operations at the object level. The important point you should note here is that in this type of framework you have to “first identify keywords and then map them with your functions”.
In this framework, all of test suites, test cases, test data are generated from external files Excel. Mark that the Excel file formats are solely user defined.
I will explain the structure of each Excel file based on the below images:

- Test Execution Plan excel file: describes list of all test suites with name, description, run mode and path to test suite Excel files. All test suites with run mode “Yes” will be executed.

- Test Suite excel files: The test suite is an assortment of more than one test case grouped together for execution purpose. Each test suite file describes list of all test cases with attributes name, description, run mode, stop running test case on failure, sheet name and sheet data. Only test cases with run mode “Yes” will be executed. If we set the “StopOnFailure” attribute is Yes, the test suite will be stopped immediately if an error occurs while running that test case.

- Test Case sheets: contain test steps. The flow of the test cases will be written in the excel sheets.

Test Case is divided into four different parts. First is called as Test Step, second is Object of Test Step, third is Action on Test Object and fourth is Data for Test Object.
- Data Sheets: use the data sheets to store the test data that will be used for the test case.
Normally, test cases are written in excel file along with test data and then automation framework executes the test steps by reading the excel row one by one.

To run the test cases against multiple sets of data, you can store the test data in separate excel sheets. When you store the data separately, the data from the Excel sheets will be fetched according to column names in the data sheets. The number will be added at the end of test case name depend on the number of test data.


- Test Object sheet: locator strategies to find and match the elements that you want to interact with.
With web-based applications, Selenium supports various locator types such as id, css, xpath, name…

For mobile, Appium is a great choice for test automation framework as it can be used for all these different app/web types.
Appium is like Selenium but for mobile apps and games. Appium is also suitable for mobile web testing when real devices and real browsers are used in testing. In a nutshell, Appium is a mobile test automation framework (with a tool) that works for all: native, hybrid and mobile web apps for iOS and Android.
In order to find elements in a mobile environment, Appium implements a number of locator strategies that are specific to, or adaptations for, the particulars of a mobile device. There are available for both Android and iOS: name, xpath, id, cssSelector…
Appium provides you with a neat tool that allows you to find the elements you’re looking for. With Appium Desktop Inspector, you can find any element and its locators.


For mobile games that you cannot catch the element by locators such as Unity games, you can integrate this framework with Sikuli API library in order to implement image recognition. Sikuli will detect and perform actions on detected images.

The Object values represent the image names that you want to perform the actions instead of the element’s name in this case.

The image will be recognized and returned in coordinates by Sikuli library. As you can see in the image above, the settings button is detected.
And now let’s dig in for you understand the operating mechanism of this framework.
You would need to write some code that will open excel files and handle information from each sheet of them. To read or write an Excel, Apache provides a very famous library POI. This library is capable enough to read and write both XLS and XLSX file format of Excel.

Keywords has been used to create the test cases. Actions library will read the keywords and when they are encountered and execute the functions associated with those keywords.
According to the keywords written in Excel files, the framework will perform the actions on UI.

Selenium is used for Browser automation whereas Appium is used for Mobile app automation. So, it depends on your testing scenario, whether you are targeting mobile app or a web browser. If your target is testing a mobile app then you should go with Appium actions and if your target is web browser then use Selenium actions.


To reduce the time and efforts of testing, I implemented parallel execution concept to run the test suites on multiple browsers or devices simultaneously by using ExecutorService and SwingWorker.

While parallel testing has saved us huge amounts of time and effort, it still has hardware limitations (you always need more devices/processing power)
You totally can run a test parallel on browsers and devices but in case responsive issue does not affect your test.

Your tests can run in parallel in locally (local computer) or across remote machines by using Selenium Grid.

Finally, the key part of a good testing infrastructure is test result reporting. Reports are arguably the most valuable tool available to project teams and stakeholders. Reporting plays a very important role in Automation so we can create different type of reports like testng Report, Xslt report, customized reports with listeners but today we will cover unique reporting which allow us to generate log and add screenshot and many other feature like Graph, DashBoard and so on.
Report Portal is a real-time reporting system for automated tests with custom dashboards, widgets, metrics, customizable defect type, history and smart analysis based on Machine Learning.
I rounded up the top eight advantages you can expect from report portal:
– You can easily integrate Reportportal with your test frameworks, as well as collect and browse all project tests in one place.

– Receive analytics in real-time: Tests are reflected in ReportPortal in a real time, so you can begin an investigation job of the failure reasons immediately after the test is completed.

– With Report Portal you have access to executions of all auto tests on your project and find info about any test item easily.

– Aggregate all info about test in one place: test history, logs, attachments.

– Classify test failures and quickly observe statistics around the launch as a whole.

– Reduce time cost and analyze the failure reasons by Auto-Analyzer based on Machine Learning.

– Integrate with Bug tracking systems Jira or Rally.

– Track release readiness: Use widget for creating the report about a product status, effectiveness of automation and a readiness to the Release.

To integrate with Report Portal, I built a function that simulates ITestNGService to implement operations for interaction Report Portal.

And now it’s showtime! Here is my automation testing tool based on Hybrid framework. This tool was written in Java and used Selenium, Appium, Report Portal.
The first and the foremost step is to create excel files of test suites and test cases that you want to run test. In this demo, I created 2 test suites. The first suite executes the searching action on Google page. The other one executes the login action on Facebook with invalid information.


The test cases of 2 test suites:


And step of each test case:

With test data:


After creating excel files, open the automation testing tool and choose the project that you want to run test.

In the main form, the excel data will be loaded into data list accordingly.

Choose browsers or devices for each test suite:
With the Facebook test suite, run 2 chrome and 1 Firefox browsers in parallel. In this test suite, we set run mode “Yes” for only test case Login so the test case “Register” will not be displayed.

With the Google test suite, run with 1 chrome and 1 Firefox browsers in parallel. Because this test suite has 2 test data “Automation Testing” and “Manual Testing” (Data Sheets image) so it has 2 test case with number at the end of name “Google – 1” and “Google – 2”.

Let’s run it!
After clicking on Start button, 5 web browsers will be run simultaneously (3 for Facebook test suite, 2 for Google test suite)

When all of them finish, you should be able to see the results in your ReportPortal


Facebook test suite result:

Google test suite result:

Logs of an error with Excel info, trace and screenshot:


And the metrics dashboard after few tests run:

That’s it! You’ve run an automation test successfully with steps in the form of simple and convenient spreadsheets. Everyone of the team can build sophisticated tests without writing a single line of code. This tool can ultimately help you in bringing down the bid price for testing for the customer.
Finally, thanks for reading, I hope that this article provided some useful information about one of automation testing frameworks and the benefits of automation testing.
Quan Nguyen
