PropTech (Property Technology) refers to a small part of digital transformation in Real Estate industry, using technology innovations to tackle challenges in the Property sector (Dearsley, 2017). PropTech comprises of companies/startups offering IT solutions or innovative business model to make Real Estate transactions more fruitful and efficient (Lecamus, 2017).
For the new business model, PropTech organizations target the traditional inefficiency and obsolete procedures of the Real Estate area. For innovative products, PropTech organizations develop innovative hardware, software, as well as other core technologies in building fittings, fixtures, materials, and systems. (Maarbani, 2017)
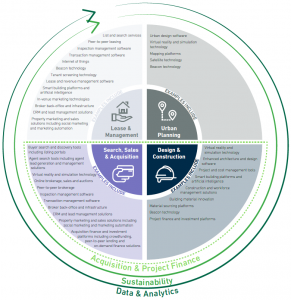
PropTech products fall into 4 main categories:
- Urban Planning: Companies in this vertical focus on various aspects of urban, rural and community planning, including improving processes related to the land release, planning approvals, protection, and use of the environment, and the enhanced design of the urban environment.
Example:
- Satellite technology
- Mapping platforms
- Beacon technology
- Design & Construction: Including tools and processes used for the design, development, and construction of residential, commercial and industrial Real Estate projects.
Example:
- Project and cost management tools
- Enhanced architecture and design software
- Smart building platforms and artificial intelligence
- Search, Sales & Acquisition: Including tools, processes and business models for searching, marketing and acquiring new and existing residential, commercial and industrial Real Estate.
Example:
- CRM and lead management solutions
- Online brokerage, sales, and auctions
- Buyer search and discovery tools including listing portals
- Leasing & Management: Including tools, processes and business models used for the leasing and management of residential, commercial or industrial Real Estate, from single properties through to solutions designed for complex property portfolios.
Example:
- Lease and revenue management software
- Transaction management software
Above all, Data & Analytics companies identify, collate and analyze relevant big data to enhance operational efficiency, inform decision making and improve the experience of participants (Maarbani, 2017).
According to a survey of KPMG in 2017, the most influential PropTech innovations over the next 5 years are Big Data Analytics, IoT and AI. However, those technologies are immature and will have more substantial impacts over longer 5, 10 or 15-year period. Though now this is an early stage, companies should consider a gradual transformation plan to avoid being left behind with obsolete systems. This is a great opportunity for PropTech startups and innovative ideas to be invested and implemented before the saturation.
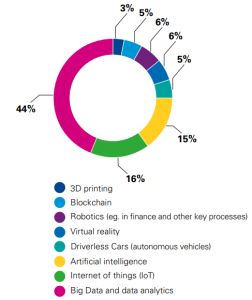
(KPMG, 2017)
Over the last 5 years, TwentyCi Asia has successfully developed PropTech products for a number of clients with high-standard delivery quality and high customer satisfaction.
CoVESTA is a fractional property investment platform that provides the opportunity to invest in any available property, anywhere in Australia. Their mission is to help ordinary Australians to get into property investment and build their future wealth.
TwentyEA comprises of experts in the UK home mover market with a team made up of property industry veterans, data scientists and start up technologists. They are well known for quarterly Property & Home mover Report which produces a comprehensive review of the UK property market.
View My Chain sheds new light on the complex home-buying process, allowing users to track every step from Sold Subject to Contract (SSTC) to exchange. Clear, honest, up-to-the-minute information on what’s happening in the chain empowers proactive agents to complete faster than ever before.
Romans is in top 5 largest property groups in the UK. With a full range of property services, Romans helps everyone interested in buying or selling, renting or letting, town planning or mortgage advice.
Comment down below if you have any question or contact us via email for free consultation. Don’t forget to share & subscribe to our blog! See you in the next post!
Olivia Dang
References
Dearsley, J., 2017. WHAT IS PROPTECH?. [Online]
Available at: http://www.jamesdearsley.co.uk/what-is-proptech/
[Accessed 24 10 2018].
KPMG, 2017. Proptech – Bridging the gap, UK: KPMG LLP.
Lecamus, V., 2017. PropTech: What is it and how to address the new wave of real estate startups?. [Online]
Available at: https://medium.com/@vincentlecamus/proptech-what-is-it-and-how-to-address-the-new-wave-of-real-estate-startups-ae9bb52fb128
[Accessed 24 10 2018].
Maarbani, S., 2017. Real Estate Technology – Threat or Opportunity?, s.l.: KPMG.
The Offshore Development Centre (ODC) is designed to act as an extension of the client organization, seamlessly offering the flexible capacity to meet variable demand. As the ODC model has matured throughout the industry, it’s become clear that successful organizations not only need to deliver tailored solutions in a repeatable manner but also need to adapt to their clients’ culture and philosophy and have a set of good practices to build on and continuously lead clients in areas of improvement.
ODCs should create a virtuous circle of delivery, improvement, mutual gain, and trust. Furthermore, there is an innate belief and expectation that members of an ODC will be thinking and operating as if they were an official part of the client’s organization. This document highlights the characteristics of a “GOOD” ODC and also provides some guidelines and behaviors for how to achieve these characteristics.
This document covers the key activities and behaviors associated with operating as an ODC: acting and thinking as part of the client’s organization, driving continuous improvement and refinement of process and tasks to align with TwentyCi business strategies of doing more with less. At the same time, our delivery methodology needs to fit the client’s culture, be applied consistently and have the same rigor and management of scope, timeliness, and quality as our project-based deliveries. This document is not a substitute for the quality management practices and templates also avoid going into details on any specific process. The purpose is to complement the existing processes and practices, highlighting key steps and good behaviors.
Target / What good looks like |
Guidelines / Behaviours |
|
|
Comment down below if you have any question or contact us via email for free consultation. Don’t forget to share & subscribe to our blog! See you in the next post!
Hung Le
In the previous post, we discussed the concept of PWA. Today we’re going to practice an example – TwentyEA Insight project, step by step. We’re using Laravel for this project but it’s the same as other PHP frameworks even other programming languages.
STEP 1: Generate icons, Manifest file in public/pwa/
We must have icons at 192×192 px and 512×512 px. The easiest way is using https://www.favicon-generator.org/ to generate icons. They also give us the HTML code to put in our layout.


STEP 2: Update Manifest file at public/pwa/icons/manifest.js
{
“name”: “TwentyEA Insight”,
“short_name”: “Insight”,
“lang”: “en-US”,
“start_url”: “/”,
“background_color”: “#2C3E50”,
“theme_color”: “#18BC9C”,
“display”: “fullscreen”,
“icons”: [
{
“src”: “\/pwa/icons/android-icon-36×36.png”,
“sizes”: “36×36”,
“type”: “image\/png”,
“density”: “0.75”
},
{
“src”: “\/pwa/icons/android-icon-48×48.png”,
“sizes”: “48×48”,
“type”: “image\/png”,
“density”: “1.0”
},
{
“src”: “\/pwa/icons/android-icon-72×72.png”,
“sizes”: “72×72”,
“type”: “image\/png”,
“density”: “1.5”
},
{
“src”: “\/pwa/icons/android-icon-96×96.png”,
“sizes”: “96×96”,
“type”: “image\/png”,
“density”: “2.0”
},
{
“src”: “\/pwa/icons/android-icon-144×144.png”,
“sizes”: “144×144”,
“type”: “image\/png”,
“density”: “3.0”
},
{
“src”: “\/pwa/icons/android-icon-192×192.png”,
“sizes”: “192×192”,
“type”: “image\/png”,
“density”: “4.0”
},
{
“src”: “\/pwa/icons/android-icon-192×192.png”,
“sizes”: “512×512”,
“type”: “image\/png”
}
]
}
Here some required fields for the manifest file.
- name – display before app be loaded
- short_name – display on the home screen
- display – should use fullscreen to look like native apps as the concept of PWA 🙂
- start_url
- icons – Must be at least 192x192px and 512x512px.
STEP 3: Created Js file for Service Worker
created sw.js at “public/sw.js”.
//This is the “Offline copy of pages” wervice worker
//Install stage sets up the index page (home page) in the cahche and opens a new cache
self.addEventListener(‘install’, function(event) {
var indexPage = new Request(‘index.html’);
event.waitUntil(
fetch(indexPage).then(function(response) {
return caches.open(‘pwabuilder-offline’).then(function(cache) {
console.log(‘[PWA Builder] Cached index page during Install’+ response.url);
return cache.put(indexPage, response);
});
}));
});
//If any fetch fails, it will look for the request in the cache and serve it from there first
self.addEventListener(‘fetch’, function(event) {
var updateCache = function(request){
return caches.open(‘pwabuilder-offline’).then(function (cache) {
if (event.request.cache === ‘only-if-cached’ && event.request.mode !== ‘same-origin’) {
return;
}
return fetch(request).then(function (response) {
console.log(‘[PWA Builder] add page to offline’+response.url)
return cache.put(request, response);
});
});
};
event.waitUntil(updateCache(event.request));
event.respondWith(
fetch(event.request).catch(function(error) {
console.log( ‘[PWA Builder] Network request Failed. Serving content from cache: ‘ + error );
//Check to see if you have it in the cache
//Return response
//If not in the cache, then return error page
return caches.open(‘pwabuilder-offline’).then(function (cache) {
return cache.match(event.request).then(function (matching) {
var report = !matching || matching.status == 404?Promise.reject(‘no-match’): matching;
return report
});
});
})
);
})
The power of PWA is right here. In this, we can cache anything to make our app be able to run offline. We can cache request, data, etc.
STEP4 : Put HTML code in <head> of tempate file
<link rel=”apple-touch-icon” sizes=”57×57″ href=”{{ url(‘/pwa/icons/apple-icon-57×57.png’) }}“>
<link rel=”apple-touch-icon” sizes=”60×60″ href=”{{ url(‘/pwa/icons/apple-icon-60×60.png’) }}“>
<link rel=”apple-touch-icon” sizes=”72×72″ href=”{{ url(‘/pwa/icons/apple-icon-72×72.png’) }}“>
<link rel=”apple-touch-icon” sizes=”76×76″ href=”{{ url(‘/pwa/icons/apple-icon-76×76.png’) }}“>
<link rel=”apple-touch-icon” sizes=”114×114″ href=”{{ url(‘/pwa/icons/apple-icon-114×114.png’) }}“>
<link rel=”apple-touch-icon” sizes=”120×120″ href=”{{ url(‘/pwa/icons/apple-icon-120×120.png’) }}“>
<link rel=”apple-touch-icon” sizes=”144×144″ href=”{{ url(‘/pwa/icons/apple-icon-144×144.png’) }}“>
<link rel=”apple-touch-icon” sizes=”152×152″ href=”{{ url(‘/pwa/icons/apple-icon-152×152.png’) }}“>
<link rel=”apple-touch-icon” sizes=”180×180″ href=”{{ url(‘/pwa/icons/apple-icon-180×180.png’) }}“>
<link rel=”icon” type=”image/png” sizes=”192×192″ href=”{{ url(‘/pwa/icons/android-icon-192×192.png’) }}“>
<link rel=”icon” type=”image/png” sizes=”32×32″ href=”{{ url(‘/pwa/icons/favicon-32×32.png’) }}“>
<link rel=”icon” type=”image/png” sizes=”96×96″ href=”{{ url(‘/pwa/icons/favicon-96×96.png’) }}“>
<link rel=”icon” type=”image/png” sizes=”16×16″ href=”{{ url(‘/pwa/icons/favicon-16×16.png’) }}“>
<link rel=”manifest” href=”/pwa/icons/manifest.json”>
<meta name=”msapplication-TileColor” content=”#ffffff”>
<meta name=”msapplication-TileImage” content=”{{ url(‘/pwa/icons/ms-icon-144×144.png’) }}“>
<meta name=”theme-color” content=”#ffffff”>
<!– Service worker registration –>
<script type=”text/javascript”>
if(‘serviceWorker’ in navigator) {
navigator.serviceWorker.register(‘{{ url(‘/sw.js’) }}‘, {scope: ‘/’})
.then(function (registration) {
console.log(‘Service Worker Registered’);
});
navigator.serviceWorker.ready.then(function (registration) {
console.log(‘Service Worker Ready’);
});
}
</script>
{{– Preloader –}}
Now we are done with coding, let’s take a look at Chrome debug tool to make sure everything is ready.
STEP5: Audits, Manifest checking on PC
Hit “Run audits” button

Audits result

Manifest result

Sometimes you’ll get “No manifest detected”. Try clicking on “Run audits” again and fix the error on that.
Service worker result

STEP 5: Experience the result
On IOS


On Android


The required fields show PWA popup on Google Chrome on Android
Only on Android popup will be showing as a minibar. On IOS, you have to follow this “Share > Add To Homescreen” as mentioned in the previous post.
- The web app is not already installed
- Meet a user engagement heuristic (currently, the user has interacted with the domain for at least 30 seconds)
- Include a web app manifest that includes:
- short_name or name
- icons must be a 192px and a 512px sized icons
- start_url
- display must be one of fullscreen, standalone, or minimal-ui
- Served over HTTPS (required for service workers)
- Has registered a service worker with a fetch event handler
Hope you find this issue useful. Comment down below if you have any question or contact us via email for free consultation. Don’t forget to share & subscribe to our blog! See you in the next post!
Hung Pham
The cost of CRM technology is falling and the flow of consumer data is expanding. Add to that the escalation in platforms to reach people – from mobile, social media and apps such as Snapchat to more unexpected places like screens in driverless cars – and you can see why brands are excited at the opportunities for engaging more and more with consumers through CRM. Or are they?
The flip side to this explosion in opportunities is that many companies are feeling overwhelmed at the level of sophistication in systems. Add to this any additional challenges brought on by GDPR. For any growing business, CRM should undoubtedly be a long-term goal. Today it is possible to get CRM up and running with a lighter touch. However, it is better to take time to get it right and build the right foundations, not just in terms of technology but also within business roles and culture, to ensure that it will really achieve business goals.
So what do companies need to do to ensure they get the CRM they need?
-
Make CRM a Board-level issue
Today, CRM can be redefined as ‘Conversations that are Relevant and Measurable’. It is about managing a conversation with a customer, regardless of when or where it takes place, or who within the organization is on the other side. The focus and investment required making CRM work across the whole business and make it become part of a company’s ethos and culture requires the kind of top-level buy-in and investment that only comes from making conversation management a Board position.
-
Take the long view
To implement the right CRM for a business, it’s necessary to take the long view and spend time identifying what data attributes from across all customer touchpoints actually make a difference in its own consumer conversations – and which will, therefore, help it to achieve its goals. For instance, it is possible that a brand with a strong focus on Millennials may find that it only needs to implement mobile-based CRM which will be much easier and less costly to set up.
-
Implement ‘mini’ CRM campaigns
There is an alternative ‘no tech’ CRM that companies can start to use straight away as a stopgap, giving them the space they need to work towards full CRM implementation. This is to create ‘mini’ CRM campaigns when consumers actually have their wallets open. Instead of trying to make sense of all the data all at once, they can take a pared-down approach which combines transactional data with external signals to pinpoint key events in a customer’s life which affect their purchasing behavior. These events could be, for example, when someone is moving home, having a baby or retiring. If we can identify what life event someone is going through, we can understand the context that is driving their consumer decisions and respond appropriately. This is a much simpler, but very effective way of creating the kind of ‘marketing in the moment’ that CRM provides – albeit for a shorter time period.
In today’s complex world there is no one-size-fits-all solution to CRM. These steps ensure organizations have the best chance of getting the right CRM for their own unique needs – and ultimately of maximizing ROI for the long term.
Liked this article? To read more of our marketing and data insights, click here.
Objectives:
Deploy a highly scalable Nodejs app on GCE

Prerequisites:
1.Folk and clone this repo: https://github.com/hangnhat57/compute-engine-101/
2. Create a service account which has Roles: Compute Instance Admin (v1) and Source Repo Writer

Create a service account
Deployment Strategy:
1.Create a startup script which will automatically get the code, install dependencies then start web server right after instances start
2.Create an instance template with a startup script
3.Create an instance managed group and enable autoscaling
4.Create a load balancing to route traffic between instances of group
Actions:
1. Open Google Web Console, then go to Source Repositories.
2. Enable API for the project, this could take a while

Enable Source API for the project
3. Create a repository in CSR. It will give you 3 options how you save your code. For me, I mirror this repository with my GitHub project.
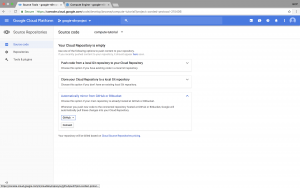
Select connect to Github and select project for mirroring
Hold on! Why do we have to mirror Github repo to Google? Why don’t we directly use Github?
In case your repository is private, when an instance starts, it would require your credential to get the code from repo. Because we use startup start, cloning source code to instance must be automatic without any human interaction. This means you’ll have to store your ssh key or user/password in instance metadata/environment variable, therefore it’s not the most effective way. So we mirror to GSR then grant access permission for a service account which will be assigned to instance template.
4. On your local machine, open terminal then cd to project folder that you’ve cloned.
5.Open startup.sh file, change <repo name> to your google repository name then save it.
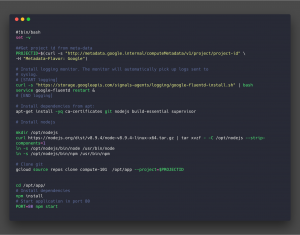
6. Open create-ins-template.sh, change <project-id> to your project id. <service-account-name> to the service account that you’ve created in prerequisites step. Then execute it.
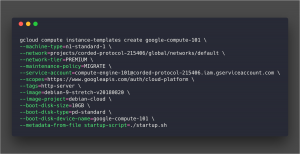
You can go to web console -> Compute Engine -> Instance templates section to create manually by Web UI also.

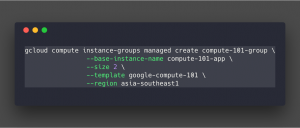
7. Next, we create a managed instances group. Open create-ins-group.sh and execute first script block.
Then active auto-scaling for that group
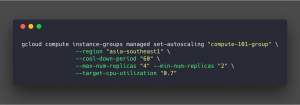
Now we have an instance group that has the minimum of 2 instances in the region, will add or remove VMs to group if CPU usage reaches 70%. Maximum instances number is 4.
8.Execute the script in create-health-check.sh to create an HTTP health check for Load Balancer

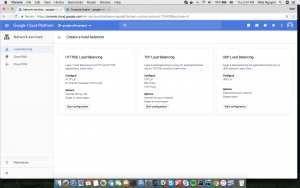
9. Now on Web Console, go to Network services > Load balancing and click on Create load balancer. Select Config HTTP(s) load balancer.
10. Create a new backend service with the instance group and health check we’ve just created.

Leave Host and Path rules, Frontend config by default, then Create the Load Balancer
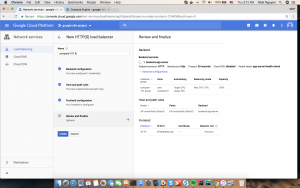
The load balancer would take a moment to set things up, then you can access your web app through load balancer external ip

And that’s it. You’ve deployed successfully a web server which always ready to scale up when needed. Autoscaler is turned on in the Instance Group governing the two instances. If there is an increase in usage (CPU in our example), the Autoscaler will spawn a new instance to handle the increase in traffic.
Have you read the previous post of the Google Cloud Series? Make sure you check it right here
Please share & subscribe if you find this helpful! Also feel free to ask any question by commenting below or sending an email to contact@twentyci.asia
Nhat Nguyen
AWS – Amazon Web Services
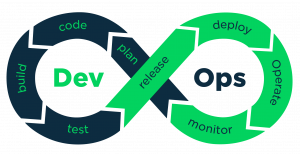
Whether you’re striving for a new role as a DevOps engineer, or a startup looking to hire one, you’ll need to be in search of several specific AWS skills.
DevOps Pipeline
Jenkins isn’t the only build server, but it’s been around for a long time, so it’s popular. You can also do well with CircleCI or Travis or even Amazon’s own CodeBuild & CodePipeline.
You should also be comfortable with a configuration management system. Ansible is my personal favorite but obviously, there is lots of Puppet & Chef out there too. So let’s talk about the playbook you wrote, how it configures the server, installs packages, edits configs and restarts services.
Bonus points if you can talk about handling deployments with Autoscaling groups. Those dynamic environments can’t easily be captured in static host manifests, so talk about how you handle that.
Of course, you should also be good with Git, Bitbucket or Codecommit, discuss how you create a branch, what’s Gitflow and when/how do you tag a release.
Also be ready to discuss how a code checkin can trigger a post commit hook, which then can go and build your application, or new infra to test your code.
CloudFormation or Terraform
Terraform is MacOSX or iPhone to CloudFormation as Android or Windows. I’m partial to Terraform. Why? Well, it’s a more polished and nicer language to write in. CloudFormation is downright ugly. But hey, both of them can get the job done.
AWS Services
There are lots of them, but the core service is what you should really focus on in the interview. So here’re some key questions you should keep in mind:
CloudWatch for centralized logging, how does it integrate with ECS or EKS?
Route53, how do you create a zone? How do you do Geo Load Balancing? How does it integrate with CertificateManager? Can Terraform build these things?
EC2 is the basic computing service, what happens when an instance dies? Or when it boots? What is a user-data script? How do you use one? What’s an AMI? How do you build them?
What about virtual networking? What is a VPC? Or a private subnet? How do you deploy a NAT? What’s it for? How do security groups work?
What are S3 buckets? About infrequently accessed? How about glacier? What are lifecycle policies? How do you do Cross Region Replication? How do you setup CloudFront? What’s a distribution?
What types of load balancers are there? Classic & Application are the main ones. How do they differ? ALB is smarter, it can integrate with ECS for example. What settings should I be concerned with? What about health checks?
What is Autoscaling? How do I setup EC2 instances to do this? What’s an Autoscaling group? Target? How does it work with ECS? What about EKS?
DevOps isn’t about writing application code, but you’re surely going to do writing jobs. What language do you like? Python and shell scripting is a start. What about Lambda? Think about frameworks to deploy applications.
Databases
You should have excellent database skills even if you’re not the day-to-day DBA. Amazon RDS certainly makes administering a bit easier most of the time. But upgrading often requires downtime, and unfortunately, that’s wired into the service. Personally, I see mostly Postgresql, MySQL & Aurora. You should get comfortable tuning SQL queries and optimize, analyze your slow query log and provide an output.
Amazon’s analytics offering is getting stronger. The purpose-built Redshift is everywhere these days. It may use a PostgreSQL driver, but there’s a lot more under the hood. You also may want to look at Spectrum, which provides an external table type interface, to query data directly from S3.
Not on Redshift yet? Well, you can use Athena as an interface directly onto your data sitting in S3, it’s even quicker.
For larger data analysis or folks that have systems built around the technology, Hadoop deployments or EMR may be good to use as well.

What else do you think interviewers should question for a good DevOps?
Please leave a comment below or send an email, I’d love to know your opinions and discuss more of the subject.
Nhat Nguyen
When developing a website or specifically, an administration tool, tabular data display is pretty popular.
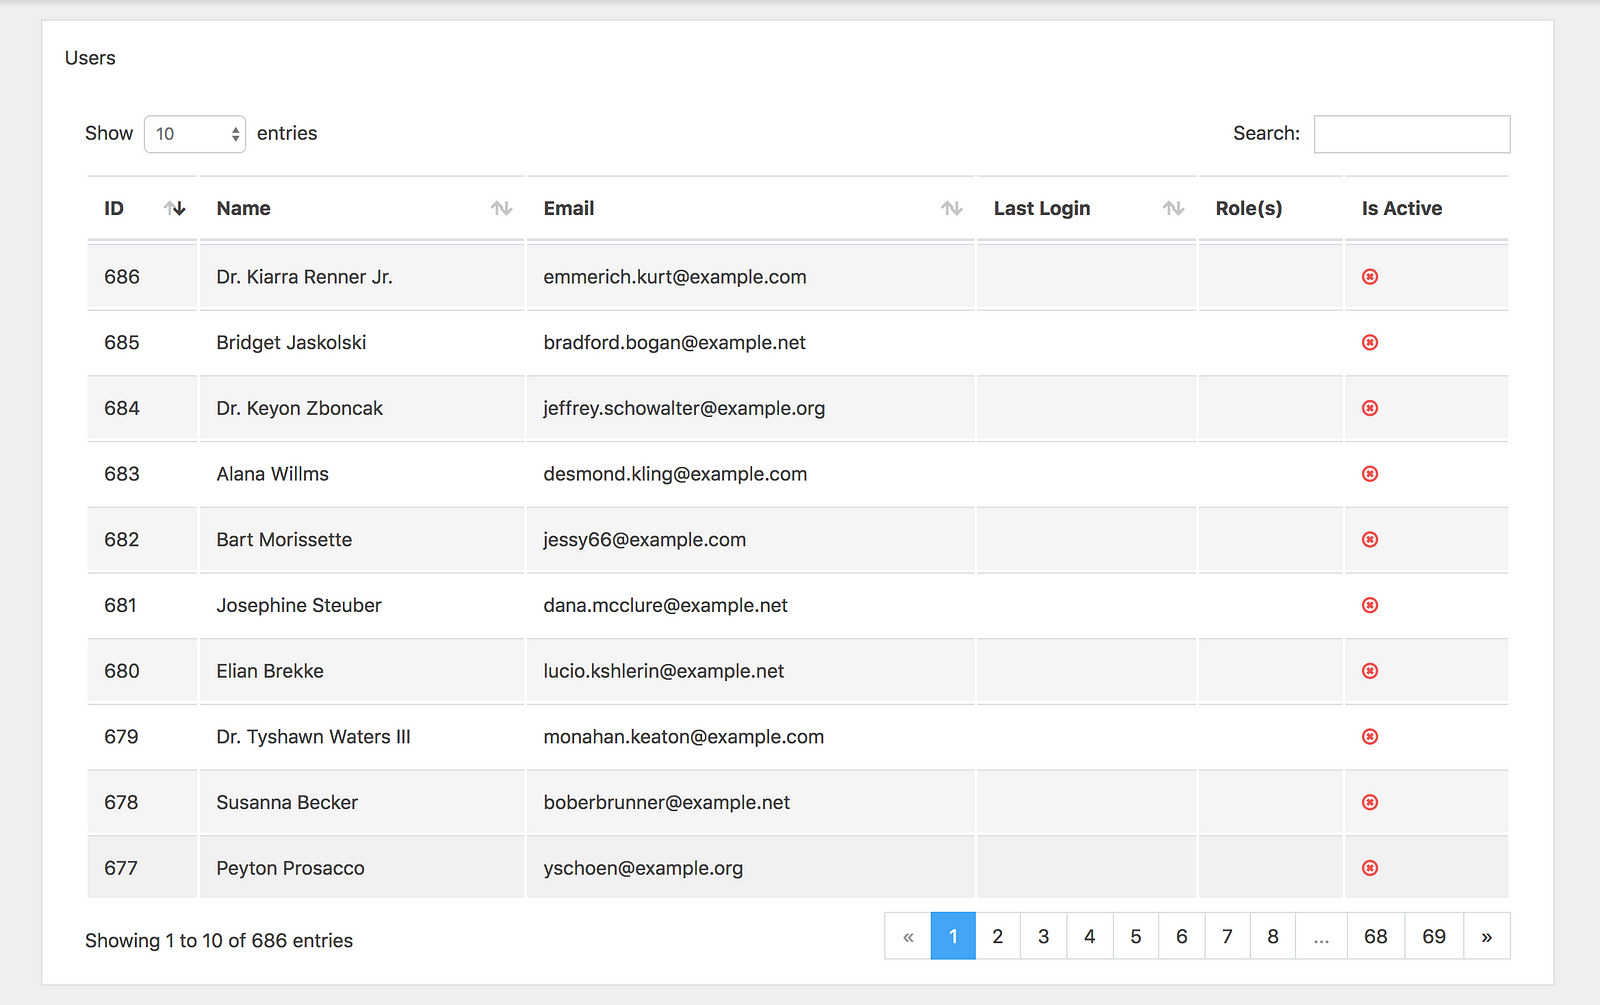
Before, pagination bar is used to be rendered in the back-end, but now, following the trend, I use React to develop a SPA (Single Page Application) administration tool, the pagination bar will be rendered in the front-end. As the pagination bar is used repeatedly and there is not any available package that is simple and easy to use, also one package is only for one component, so I have done some research and wrote a component to use in the entire project. It looks like this:

It could look complicated but discard all the css style, component Paginator will have these displays:
Prev 1 2 3 4 5 [6] 7 8 ... 68 69 Next
Prev 1 2 ... 4 5 6 [7] 8 9 10 ... 68 69 Next
Prev 1 2 ... 60 61 62 [63] 64 65 66 ... 68 69 Next
Prev 1 2 ... 61 62 63 [64] 65 66 67 68 69 Next
Create Prototype
As I keep looking into it, the component only requires input data, for example: currentPage, total (items), perPage (items) and handlePageChangedfunction to switch page and call request to update data when switching page.
To create prototype, I use create-react-app:
create-react-app demo-paginator
Top-down style, I assume there is the component,Paginator update App.js again to display with the test data:
import React, { Component } from 'react';
import Paginator from './Paginator';

class App extends Component {
    state = {
        currentPage: 1,
        total: 686,
        perPage: 10,
    };

    // Set current page to a new page and call request to refresh data
    handlePageChanged = (page) => {
        this.setState({
            currentPage: page,
        });

        // call request to refresh data
    };

    render() {
        const {
            currentPage, total, perPage,
        } = this.state;

        return (
            <Paginator
                currentPage={currentPage}
                total={total}
                perPage={perPage}
                handlePageChanged={this.handlePageChanged}
            />
        );
    }
};

export default App;
Then create a file Paginator.js to render a stub data:
import React from 'react';

const Paginator = () => (
    <div>
        {'1 2 3 4 5 [6] 7 8 ... 68 69'}
    </div>
);

export default Paginator;
After running yarn to install package dependencies and yarn start to run the project, we have a stub result:
1 2 3 4 5 [6] 7 8 ... 68 69
Calculate the values
Next step, we need to calculate all elements to render.
We assign a part of elements will fully display like this:
1 2 … 60 61 62 [63] 64 65 66 … 68 69
Including 3 pieces:
first => 1 2
slider => 60 61 62 [63] 64 65 66
last => 68 69
We continue to break down:
import _ from 'lodash';

// ...

makeUrlWindow() {
    return {
        first: [1, 2],
        slider: [60, 61, 62, 63, 64, 65, 66],
        last: [68, 69],
    };
}

elements() {
    const urlWindow = this.makeUrlWindow();

    return _.compact([
        urlWindow.first,
        Array.isArray(urlWindow.slider) ? '...' : null,
        urlWindow.slider,
        Array.isArray(urlWindow.last) ? '...' : null,
        urlWindow.last,
    ]);
}
Now we need to render slider part of the page link. Then, we calculate the total number of pages total và perPage:
lastPage() {
    const { total, perPage } = this.props;
    return Math.max(Math.ceil(total / perPage), 1);
}
If the total number of pages is not enough to slide, we put it back to a simple slider:
1 2 3 4 5 [6] 7 8
makeUrlWindow() {
    const lastPage = this.lastPage();

    // small slider
    if (lastPage < 12) {
        return {
            first: _.range(1, lastPage + 1),
            slider: null,
            last: null,
        };
    }

    // url slider
    // ...
}
If the current page is very close to the beginning of the page range, we will just render the beginning of the page range, followed by the last two of the links in this list, since we don’t have space to create a full slider.
1 2 3 4 5 [6] 7 8 ... 68 69
makeUrlWindow() {
    // ...

    // url slider
    const onBothSide = 6;

    const { currentPage } = this.props;

    // if slider too close to beginning
    if (currentPage <= onBothSide) {
        return {
            first: _.range(1, onBothSide + 3),
            slider: null,
            last: _.range(lastPage - 1, lastPage + 1),
        };
    }
}
If the current page is close to the ending of the page range we will just get this first couple pages, followed by a larger window of these ending pages since we’re too close to the end of the list to create a full-on slider.
1 2 ... 61 62 63 64 65 66 67 [68] 69
makeUrlWindow() {
    // ...

    // if slider too close to ending
    if (currentPage > lastPage - onBothSide) {
        return {
            first: _.range(1, 3),
            slider: null,
            last: _.range(lastPage - (onBothSide + 2), lastPage + 1),
        };
    }
}
If we have enough space on both sides of the current page to build a slider we will surround it with both the beginning and ending caps, with this window of pages in the middle providing a Google-style sliding paginator setup.
1 2 ... 60 61 62 [63] 64 65 66 ... 68 69
makeUrlWindow() {
    // ...

    // get full slider
    return {
        first: _.range(1, 3),
        slider: _.range(currentPage - 3, currentPage + 4),
        last: _.range(lastPage - 1, lastPage + 1),
    }
}
To display two links: Prev và Next, we need to d more calculation of these values,onFirstPagehasMorePage, prevPage, nextPage:
onFirstPage() {
    return this.props.currentPage <= 1;
}

hasMorePages() {
    return this.props.currentPage < this.lastPage();
}

previousPage() {
    const { currentPage } = this.props;
    return currentPage > 1 ? currentPage - 1 : 1;
}

nextPage() {
    const { currentPage } = this.props;
    const lastPage = this.lastPage();
    return lastPage > currentPage ? currentPage + 1 : lastPage; }
Render
Based on all the previous calculation, now we can render:
constructor(props) {
    super(props);
    this.onClick = this.onClick.bind(this);
}

onClick(page, e) {
    e.preventDefault();
    const { handlePageChanged } = this.props;
    handlePageChanged(page);
}

// ...

render() {
    const { currentPage } = this.props;

    const liStyle = {
        paddingLeft: '0.5rem',
        paddingRight: '0.5rem',
    };

    return (
        <ul style={{ listStyle: 'none', display: 'flex' }}>
            <li style={liStyle}>
                {
                    this.onFirstPage() ? (
                        <span>Prev</span>
                    ) : (
                        <a href="#" onClick={e => this.onClick(this.previousPage(), e)}>Prev</a>
                    )
                }
            </li>
            {this.elements().map((element, index) => {
                const Element = () => {
                    if (typeof element === 'string') {
                        return (
                            <li style={liStyle}>{element}</li>
                        );
                    }
                    if (Array.isArray(element)) {
                        return element.map((page) => {
                            if (page === currentPage) {
                                return <li style={liStyle} key={page}>{page}</li>;
                            }
                            return (
                                <li style={liStyle} key={page}>
                                    <a href="#" onClick={e => this.onClick(page, e)}>{page}</a>
                                </li>
                            );
                        });
                    }
                    return null;
                };
                return <Element key={index} />;
            })}
            <li style={liStyle}>
                {this.hasMorePages() ? (
                    <a href="#" onClick={e => this.onClick(this.nextPage(), e)}>Next</a>
                ) : (
                    <span>Next</span>
                )}
            </li>
        </ul>
    );
}
And we have the result as in this picture:

Creating a Component Paginator is pretty simple, huh? Leave a comment below or email us if you want to know more about the subject. Please make sure you share & subscribe if you find this post helpful. Good luck and have fun!
Cuong Giang
What is Artificial Intelligence (AI)?
Artificial Intelligence is designed machines that has the ability to think, also known as intelligence of machines.
The very idea to create an artificial intelligence is to make humans’ lives easier. Researchers of artificial intelligence want to bring in the emotional quotient to the machines along with the general intelligence.

Advantages of Artificial Intelligence
1. Error Reduction:
Artificial intelligence helps us in reducing errors, and the chance of reaching accuracy with a greater degree of precision is a possibility. It is applied in various studies such as exploration of the space.
Intelligent robots are fed with information and sent to explore the space. Since they are machines with metal bodies, they are more resistant and have greater ability to endure the space and hostile atmosphere.
They are created and acclimatized in such a way that they cannot be modified or get disfigured or broken down in the hostile environment.
2. Difficult Exploration:
Artificial intelligence and the science of robotics can be practical in mining and other fuel exploration processes. Not only that, these complex machines can be used for exploring the ocean floor and hence overcome the human limitations.
Due to the programme of the robots, they can perform more laborious and hard work with greater responsibility. Moreover, they do not wear out easily.
3. Daily Application:

Computed methods for automated reasoning, learning and perception have become a common phenomenon in our everyday lives. We have our lady Siri or Cortana to help us out.
We are also hitting the road for long drives and trips with the help of GPS. Smartphone in an apt and every day is an example of how we use artificial intelligence. In utilities, we find that they can predict what we are going to type and correct the human errors in spelling. That is machine intelligence at work.
When we take a picture, the artificial intelligence algorithm identifies and detects the person’s face and tags the individual when we are posting our photographs on the social media sites.
Not only that, Artificial Intelligence is widely employed by financial institutions and banking institutions to organize and manage data. Detection of fraud uses artificial intelligence in a smart card based system.
4. Digital Assistants:
Highly advanced organizations use ‘avatars’ which are replicas or digital assistants who can actually interact with the users, thus saving the need for human resources.
For artificial thinkers, emotions come in the way of rational thinking and are not a distraction at all. The complete absence of the emotional side makes the robots think logically and take the right program decisions.
Emotions are associated with moods that can cloud judgment and affect human efficiency. This is completely ruled out for machine intelligence.
5. Repetitive Jobs:
Repetitive jobs which are monotonous in nature can be carried out with the help of machine intelligence. Machines think faster than humans and can operate multi-tasking. Machine intelligence can carry out dangerous tasks with no hesitation. Besides, their parameters, unlike humans, can be adjusted. Their speed and time are calculation based parameters only.
When humans play a computer game or run a computer-controlled robot, we are actually interacting with artificial intelligence. In the game we are playing, the computer is our opponent. The machine intelligence plans the game movements in response to our movements. We can consider gaming to be the most common use of the benefits of artificial intelligence.
6. Medical Applications:
In the medical field also, we will find the wide application of AI. Doctors assess the patients and their health risks with the help of artificial machine intelligence. It educates them about the side effects of various medicines.

Medical professionals are often trained with the artificial surgery simulators. They find a huge application in detecting and monitoring neurological disorders as they can simulate the brain functions.
Robotics plays an important role in helping mental health patients to come out of depression and remain active. A popular application of artificial intelligence is radiosurgery. Radiosurgery is used in operating tumors and this can actually help in the operation without damaging the surrounding tissues.
7. No Breaks:
In addition with all the pros mentioned, machines, unlike humans, do not require frequent breaks and refreshments. They are programmed for long hour work and can continuously perform without getting bored or distracted or even tired.
In the fourth industrial revolution, it is clear to see that the AI technology has good effects to almost every field. However, do you think that the AI has some disadvantages? Don’t be hesitate to share your ideas with us by commenting below.
Nam Bui
Nowadays, Cloud Computing is an important part of the Internet world. I remember when Apple introduced their iCloud, I thought it was funny, there would be no one want their data, especially sensitive personal data on the internet. Ironically, now most of my important files are on iCloud 😀
So Cloud Computing’s simply known as “the delivery of computing services—servers, storage, databases, networking, software, analytics and more—over the Internet” – regarding its definition. Companies offering these computing services are called cloud providers. You may know Amazon Web Service – the big guy, huh? Microsoft Azure and Google Cloud too, of course. In this series, I will give you some practices with Google Cloud Platform (GCP). Hope it will be helpful to you all, even just a little bit.
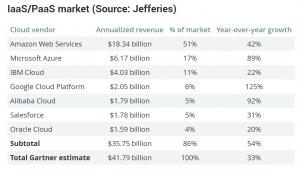
Google is a newbie in the Cloud provider market, but they are growing dramatically fast. On December 20th, 2017 Jefferies analyst John DiFucci introduced quarterly snapshots of public cloud services. Even though Amazon rules the public cloud, the year-over-year growth of 125% by Google Cloud Platform in 2017 is pretty incredible!
In this series, I will walk you through some popular resources of GCP that could help you understand more about them.
There will be 2 posts of the series
1.Introduction
2.In Action
But first, to follow this, you need to create a free trial account on GCP and install Google Cloud SDK on your device.
https://cloud.google.com/sdk/install
https://cloud.google.com/
After signing up for a new account and installing Google Cloud SDK, you should init your credential then create a separate project for practicing. So, let’s open your terminal and create it.
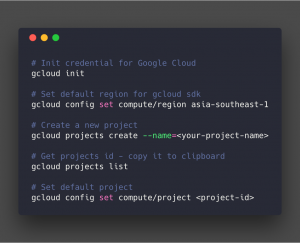
I will explain what the project is and how it benefits in another post. We have started with GCP by a few basic commands using the Google Cloud SDK command-line util.
Stay tuned for the next post! Leave a comment below or email us via contact@twentyci.asia if you have any question or want to have free consultation and please share & subscribe to our blog for more interesting posts.
Nhat Nguyen
PWAs – Progressive Web Apps
Currently, mobiles take about 52% traffic on the internet and this rate grows significantly every single day. Every company knows that a large number of potential customers come from mobile users. That’s why websites should have great designs, not only for desktop browsers but also to work perfectly on mobile browsers. New technologies come up every day to meet up with the need for web designing. And now we’ve had web browsers with responsive designs, native apps, hybrid apps like Ionic and PWAs.
What are PWAs?
Progressive Web Apps use modern web capabilities to deliver fast, native-app experience such as a home screen icon, working offline, and so on. You can check more features of web capabilities (here) with no app stores or downloads, and all the goodness of the web. Or just called them “Web Apps from Homescreen”
They’re supported on Chrome, MS Edge and Safari from IOS 11.3. On Chrome, there will be Web App Banners on the top of browsers to install apps. On Safari, there wasn’t a Web App Banners, you just need to click on “Share” icon then “Add to Homescreen”.

Nowadays, many big brands are using PWAs such as Starbucks, Pinterest, Twitter, Forbes, Instagram, etc.
Why do we need PWAs?
Save effort to develop and maintenance, a lot
We don’t need IOS team, Android team or Web team separately. Or if we build hybrid apps using Ionic, we still need Apple Store account, Google Play account, their approvals to push our apps to end users.
Make better users’ experience to increase more traffic
Progressive Web Apps are installable and live on the users’ home screen. Once loaded, everything can be cached and load instantly, regardless of the network state. You won’t see the little T-Rex anymore even it’s a fun game.
How do PWAs work?
1. Web App Manifest
This is just a json file that gives meta information about the web app. It has information like the icon of the app (which a user sees after installing it in their app drawer), the background color of the app, name of the app, short name, and so on. We can write this manifest file ourselves or we can use tools to generate one for us.

2. Service Workers
The power behind the scenes is Service Workers. They are incredible, they work independently of your app, and run in response to events like network requests, push notifications, connectivity changes, caching, offline functions, background content updates, and many others.
Service Workers work as “proxy” or Middleware in Laravel. They stand between clients and remote servers and we have full control over these.
For example, we can use Service Workers to listen on “fetch” event that is triggered whenever network request occurs. We can handle that event with full control, check for cached data and return immediately, or we can allow the request to continue to the remote server.

There’s no difference between native app icon and PWA icon
Do PWAs kill native apps? Should IOS and Android developers start looking for a new career?
Of course not. PWAs are using web capabilities, that means it has a few disadvantages comparing with native apps :
- No access to core features of OS like Touch ID, Face ID, Bluetooth
- No access to private information such as contacts, background locations
- No access to in-app payment
- Can not interact with Siri on IOS or Google on Android
So if you’re an IOS or Android developer, you have nothing to worry about, I’m sure 😉
Google has published a checklist for Progressive Web Apps. In the next post of our PWAs series, we are going into details with this checklist and how to build your own PWAs
Please make sure you subscribe to our blog for more interesting, informative posts and don’t hesitate to leave a comment below (or mail us via contact@twentyci.asia) to discuss more of the subject.
Hung Pham