Objectives:
Deploy an application with a custom environment to Google Cloud
Prerequisites:
Folk and clone this repo: https://github.com/hangnhat57/compute-engine-101/
Open Terminal and cd to the folder you’ve just cloned
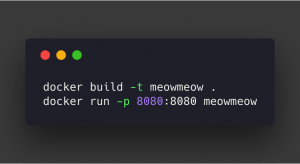
First, let’s try to run the app on a local machine to verify it has worked:
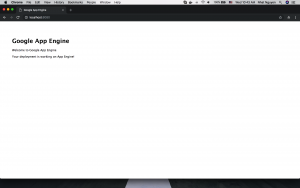
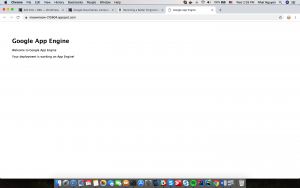
Open your browser and navigate to http://localhost:8080, you’ll see something like this:
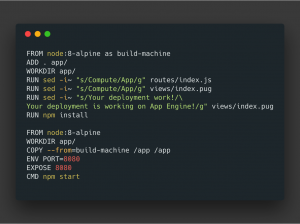
This application is serving inside a container which was customized from scratch:
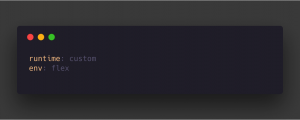
To deploy a custom container to App Engine, we have to use Google App Engine Flex – Custom Environment. By default, App Engine will serve container application in port 8080, so remember when you create an image.
App.yaml file will look like this :
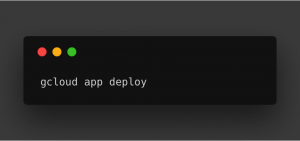
Now, on the terminal, start a command:
If this is the first time you using App Engine for the current project, Google will ask you for the region of App Engine service:
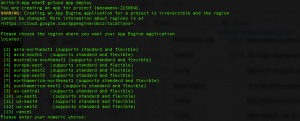
Select the region you want and wait until it finishes. Then use this command to view your app on the public:
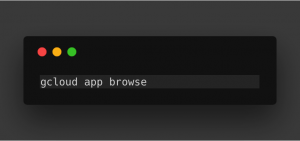
A browser would automatically open and navigate to your app:
Have you read the previous post of the Google Cloud Series? Make sure you check it right now
Comment below or email us via contact@twentyci.asia if you have any question or want to have free consultation!
Nhat Nguyen
Objectives:
Deploy a highly scalable Nodejs app on GCE
Prerequisites:
1.Folk and clone this repo: https://github.com/hangnhat57/compute-engine-101/
2. Create a service account which has Roles: Compute Instance Admin (v1) and Source Repo Writer

Create a service account
Deployment Strategy:
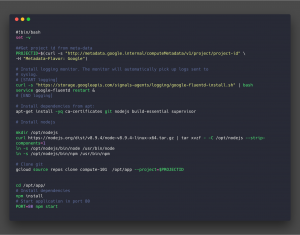
1.Create a startup script which will automatically get the code, install dependencies then start web server right after instances start
2.Create an instance template with a startup script
3.Create an instance managed group and enable autoscaling
4.Create a load balancing to route traffic between instances of group
Actions:
1. Open Google Web Console, then go to Source Repositories.
2. Enable API for the project, this could take a while
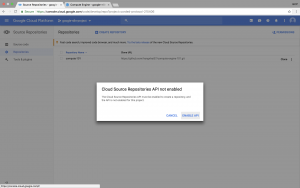
Enable Source API for the project
3. Create a repository in CSR. It will give you 3 options how you save your code. For me, I mirror this repository with my GitHub project.
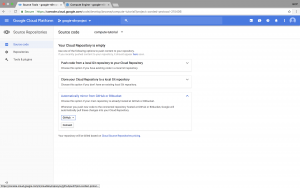
Select connect to Github and select project for mirroring
Hold on! Why do we have to mirror Github repo to Google? Why don’t we directly use Github?
In case your repository is private, when an instance starts, it would require your credential to get the code from repo. Because we use startup start, cloning source code to instance must be automatic without any human interaction. This means you’ll have to store your ssh key or user/password in instance metadata/environment variable, therefore it’s not the most effective way. So we mirror to GSR then grant access permission for a service account which will be assigned to instance template.
4. On your local machine, open terminal then cd to project folder that you’ve cloned.
5.Open startup.sh file, change <repo name> to your google repository name then save it.
6. Open create-ins-template.sh, change <project-id> to your project id. <service-account-name> to the service account that you’ve created in prerequisites step. Then execute it.
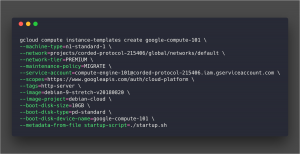
You can go to web console -> Compute Engine -> Instance templates section to create manually by Web UI also.

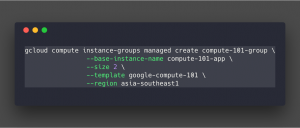
7. Next, we create a managed instances group. Open create-ins-group.sh and execute first script block.
Then active auto-scaling for that group
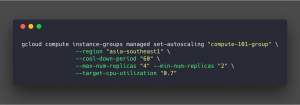
Now we have an instance group that has the minimum of 2 instances in the region, will add or remove VMs to group if CPU usage reaches 70%. Maximum instances number is 4.
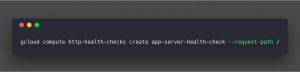
8.Execute the script in create-health-check.sh to create an HTTP health check for Load Balancer
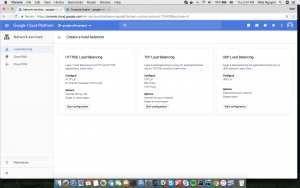
9. Now on Web Console, go to Network services > Load balancing and click on Create load balancer. Select Config HTTP(s) load balancer.
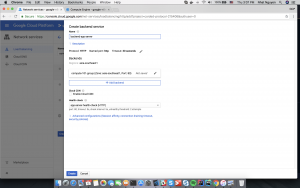
10. Create a new backend service with the instance group and health check we’ve just created.
Leave Host and Path rules, Frontend config by default, then Create the Load Balancer
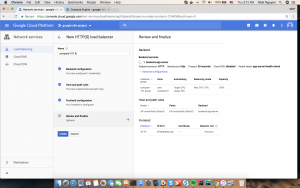
The load balancer would take a moment to set things up, then you can access your web app through load balancer external ip
And that’s it. You’ve deployed successfully a web server which always ready to scale up when needed. Autoscaler is turned on in the Instance Group governing the two instances. If there is an increase in usage (CPU in our example), the Autoscaler will spawn a new instance to handle the increase in traffic.
Have you read the previous post of the Google Cloud Series? Make sure you check it right here
Please share & subscribe if you find this helpful! Also feel free to ask any question by commenting below or sending an email to contact@twentyci.asia
Nhat Nguyen
When developing a website or specifically, an administration tool, tabular data display is pretty popular.
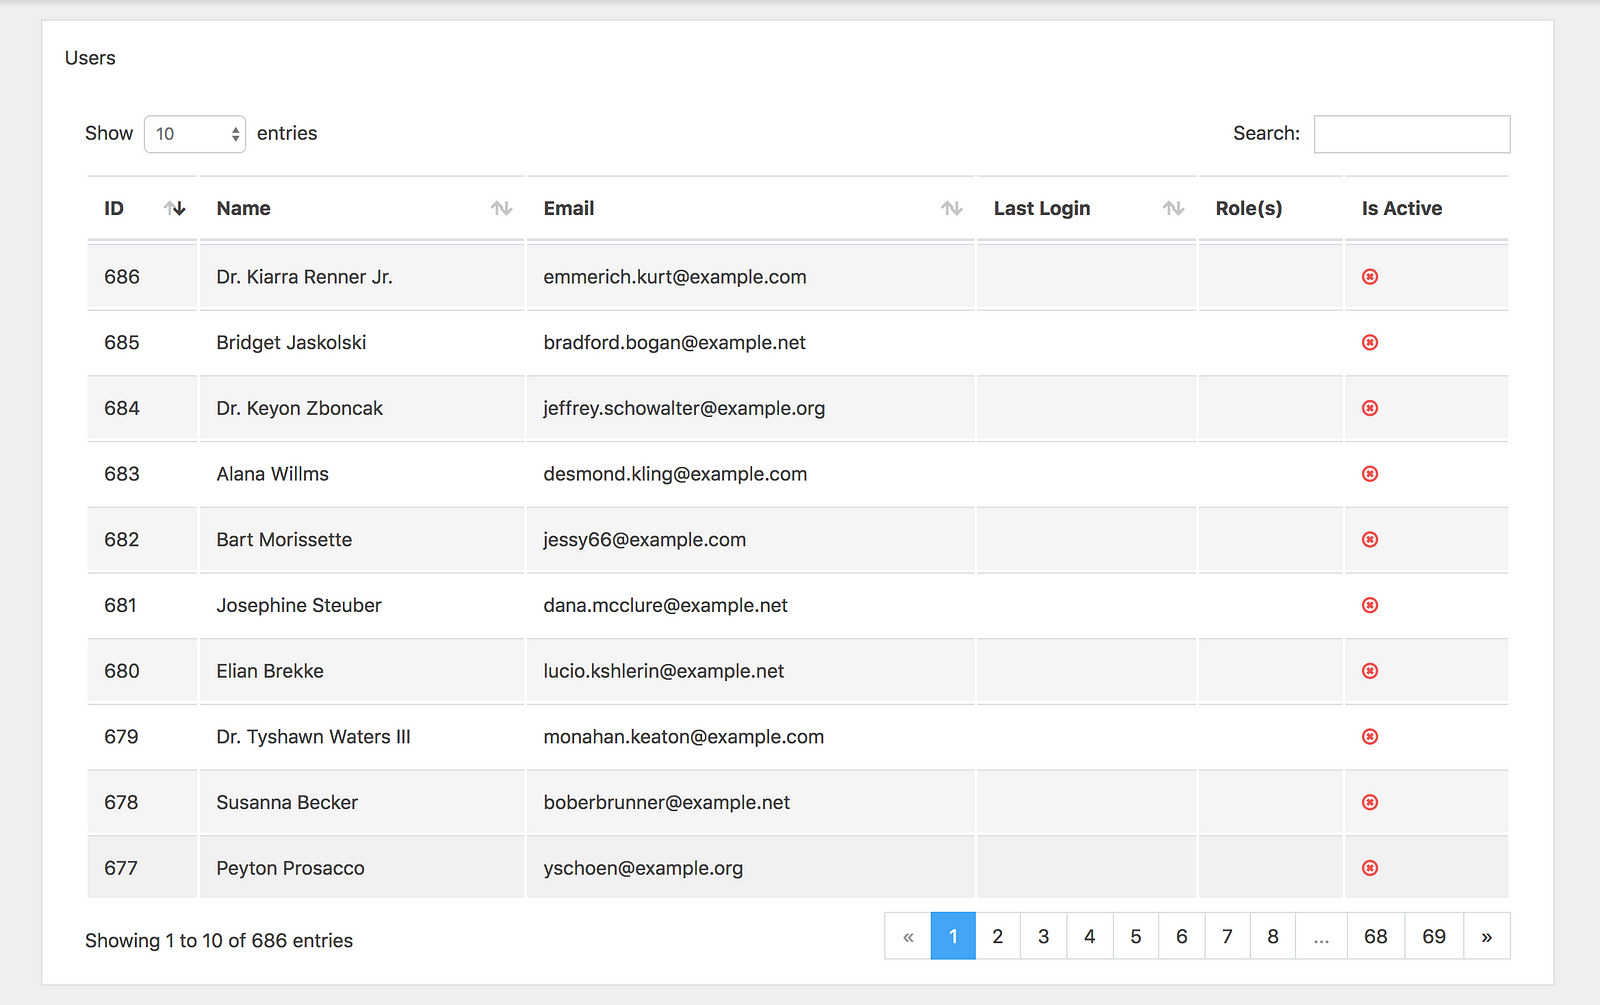
Before, pagination bar is used to be rendered in the back-end, but now, following the trend, I use React to develop a SPA (Single Page Application) administration tool, the pagination bar will be rendered in the front-end. As the pagination bar is used repeatedly and there is not any available package that is simple and easy to use, also one package is only for one component, so I have done some research and wrote a component to use in the entire project. It looks like this:

It could look complicated but discard all the css style, component Paginator will have these displays:
Prev 1 2 3 4 5 [6] 7 8 ... 68 69 Next
Prev 1 2 ... 4 5 6 [7] 8 9 10 ... 68 69 Next
Prev 1 2 ... 60 61 62 [63] 64 65 66 ... 68 69 Next
Prev 1 2 ... 61 62 63 [64] 65 66 67 68 69 Next
Create Prototype
As I keep looking into it, the component only requires input data, for example: currentPage, total (items), perPage (items) and handlePageChangedfunction to switch page and call request to update data when switching page.
To create prototype, I use create-react-app:
create-react-app demo-paginator
Top-down style, I assume there is the component,Paginator update App.js again to display with the test data:
import React, { Component } from 'react';
import Paginator from './Paginator';

class App extends Component {
    state = {
        currentPage: 1,
        total: 686,
        perPage: 10,
    };

    // Set current page to a new page and call request to refresh data
    handlePageChanged = (page) => {
        this.setState({
            currentPage: page,
        });

        // call request to refresh data
    };

    render() {
        const {
            currentPage, total, perPage,
        } = this.state;

        return (
            <Paginator
                currentPage={currentPage}
                total={total}
                perPage={perPage}
                handlePageChanged={this.handlePageChanged}
            />
        );
    }
};

export default App;
Then create a file Paginator.js to render a stub data:
import React from 'react';

const Paginator = () => (
    <div>
        {'1 2 3 4 5 [6] 7 8 ... 68 69'}
    </div>
);

export default Paginator;
After running yarn to install package dependencies and yarn start to run the project, we have a stub result:
1 2 3 4 5 [6] 7 8 ... 68 69
Calculate the values
Next step, we need to calculate all elements to render.
We assign a part of elements will fully display like this:
1 2 … 60 61 62 [63] 64 65 66 … 68 69
Including 3 pieces:
first => 1 2
slider => 60 61 62 [63] 64 65 66
last => 68 69
We continue to break down:
import _ from 'lodash';

// ...

makeUrlWindow() {
    return {
        first: [1, 2],
        slider: [60, 61, 62, 63, 64, 65, 66],
        last: [68, 69],
    };
}

elements() {
    const urlWindow = this.makeUrlWindow();

    return _.compact([
        urlWindow.first,
        Array.isArray(urlWindow.slider) ? '...' : null,
        urlWindow.slider,
        Array.isArray(urlWindow.last) ? '...' : null,
        urlWindow.last,
    ]);
}
Now we need to render slider part of the page link. Then, we calculate the total number of pages total và perPage:
lastPage() {
    const { total, perPage } = this.props;
    return Math.max(Math.ceil(total / perPage), 1);
}
If the total number of pages is not enough to slide, we put it back to a simple slider:
1 2 3 4 5 [6] 7 8
makeUrlWindow() {
    const lastPage = this.lastPage();

    // small slider
    if (lastPage < 12) {
        return {
            first: _.range(1, lastPage + 1),
            slider: null,
            last: null,
        };
    }

    // url slider
    // ...
}
If the current page is very close to the beginning of the page range, we will just render the beginning of the page range, followed by the last two of the links in this list, since we don’t have space to create a full slider.
1 2 3 4 5 [6] 7 8 ... 68 69
makeUrlWindow() {
    // ...

    // url slider
    const onBothSide = 6;

    const { currentPage } = this.props;

    // if slider too close to beginning
    if (currentPage <= onBothSide) {
        return {
            first: _.range(1, onBothSide + 3),
            slider: null,
            last: _.range(lastPage - 1, lastPage + 1),
        };
    }
}
If the current page is close to the ending of the page range we will just get this first couple pages, followed by a larger window of these ending pages since we’re too close to the end of the list to create a full-on slider.
1 2 ... 61 62 63 64 65 66 67 [68] 69
makeUrlWindow() {
    // ...

    // if slider too close to ending
    if (currentPage > lastPage - onBothSide) {
        return {
            first: _.range(1, 3),
            slider: null,
            last: _.range(lastPage - (onBothSide + 2), lastPage + 1),
        };
    }
}
If we have enough space on both sides of the current page to build a slider we will surround it with both the beginning and ending caps, with this window of pages in the middle providing a Google-style sliding paginator setup.
1 2 ... 60 61 62 [63] 64 65 66 ... 68 69
makeUrlWindow() {
    // ...

    // get full slider
    return {
        first: _.range(1, 3),
        slider: _.range(currentPage - 3, currentPage + 4),
        last: _.range(lastPage - 1, lastPage + 1),
    }
}
To display two links: Prev và Next, we need to d more calculation of these values,onFirstPagehasMorePage, prevPage, nextPage:
onFirstPage() {
    return this.props.currentPage <= 1;
}

hasMorePages() {
    return this.props.currentPage < this.lastPage();
}

previousPage() {
    const { currentPage } = this.props;
    return currentPage > 1 ? currentPage - 1 : 1;
}

nextPage() {
    const { currentPage } = this.props;
    const lastPage = this.lastPage();
    return lastPage > currentPage ? currentPage + 1 : lastPage; }
Render
Based on all the previous calculation, now we can render:
constructor(props) {
    super(props);
    this.onClick = this.onClick.bind(this);
}

onClick(page, e) {
    e.preventDefault();
    const { handlePageChanged } = this.props;
    handlePageChanged(page);
}

// ...

render() {
    const { currentPage } = this.props;

    const liStyle = {
        paddingLeft: '0.5rem',
        paddingRight: '0.5rem',
    };

    return (
        <ul style={{ listStyle: 'none', display: 'flex' }}>
            <li style={liStyle}>
                {
                    this.onFirstPage() ? (
                        <span>Prev</span>
                    ) : (
                        <a href="#" onClick={e => this.onClick(this.previousPage(), e)}>Prev</a>
                    )
                }
            </li>
            {this.elements().map((element, index) => {
                const Element = () => {
                    if (typeof element === 'string') {
                        return (
                            <li style={liStyle}>{element}</li>
                        );
                    }
                    if (Array.isArray(element)) {
                        return element.map((page) => {
                            if (page === currentPage) {
                                return <li style={liStyle} key={page}>{page}</li>;
                            }
                            return (
                                <li style={liStyle} key={page}>
                                    <a href="#" onClick={e => this.onClick(page, e)}>{page}</a>
                                </li>
                            );
                        });
                    }
                    return null;
                };
                return <Element key={index} />;
            })}
            <li style={liStyle}>
                {this.hasMorePages() ? (
                    <a href="#" onClick={e => this.onClick(this.nextPage(), e)}>Next</a>
                ) : (
                    <span>Next</span>
                )}
            </li>
        </ul>
    );
}
And we have the result as in this picture:

Creating a Component Paginator is pretty simple, huh? Leave a comment below or email us if you want to know more about the subject. Please make sure you share & subscribe if you find this post helpful. Good luck and have fun!
Cuong Giang
Nowadays, Cloud Computing is an important part of the Internet world. I remember when Apple introduced their iCloud, I thought it was funny, there would be no one want their data, especially sensitive personal data on the internet. Ironically, now most of my important files are on iCloud 😀
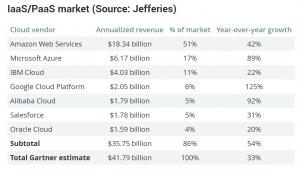
So Cloud Computing’s simply known as “the delivery of computing services—servers, storage, databases, networking, software, analytics and more—over the Internet” – regarding its definition. Companies offering these computing services are called cloud providers. You may know Amazon Web Service – the big guy, huh? Microsoft Azure and Google Cloud too, of course. In this series, I will give you some practices with Google Cloud Platform (GCP). Hope it will be helpful to you all, even just a little bit.
Google is a newbie in the Cloud provider market, but they are growing dramatically fast. On December 20th, 2017 Jefferies analyst John DiFucci introduced quarterly snapshots of public cloud services. Even though Amazon rules the public cloud, the year-over-year growth of 125% by Google Cloud Platform in 2017 is pretty incredible!
In this series, I will walk you through some popular resources of GCP that could help you understand more about them.
There will be 2 posts of the series
1.Introduction
2.In Action
But first, to follow this, you need to create a free trial account on GCP and install Google Cloud SDK on your device.
https://cloud.google.com/sdk/install
https://cloud.google.com/
After signing up for a new account and installing Google Cloud SDK, you should init your credential then create a separate project for practicing. So, let’s open your terminal and create it.
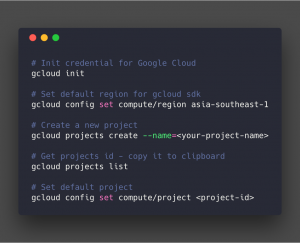
I will explain what the project is and how it benefits in another post. We have started with GCP by a few basic commands using the Google Cloud SDK command-line util.
Stay tuned for the next post! Leave a comment below or email us via contact@twentyci.asia if you have any question or want to have free consultation and please share & subscribe to our blog for more interesting posts.
Nhat Nguyen
Exploring Jenkins
Jenkins was one of the most popular CI tools used to build and test different kinds of projects. It’s now also used for CD and is a very important part in DevOps practices.
Firstly, we need to understand what CI is. CI is one of the most popular application development practice in recent time. Developers integrate new features, bug fixes in a code repository. Then CI tool verifies automatically, builds and tests to detect any problem with current sources and provides quick feedback to the development team.
“Jenkins is an open source automation server written in Java. It helps to automate the non-human part of the software development process, with continuous integration and facilitating technical aspects of continuous delivery. It is a server-based system that runs in servlet containers such as Apache Tomcat”–Wikipedia
Plugins
Plugins make Jenkins easier to learn, easier to use. There are various categories of plugins available for it, such as:
- Source code management
- Slave launchers and controllers
- Build triggers
- Build tools
- Build notifiers
- Build report
- Post-build actions
- UI plugins
- Library plugins
In this article, I’m using Laravel project with Git repo and Java e2e automation test for example build. So there are should-have plugins:
- Jenkins Pipeline plugin
- SonarQube
- Github Integration plugin
- Allure Jenkins Plugin
- Default suggestion plugin from Jenkins
The pipeline as code concept
The default interaction model with Jenkins, historically, has been very web UI driven, requiring users to manually create jobs, then manually filling in the details through a web browser. This requires additional effort to create and manage work to test and build multiple projects, it also keeps the configuration of a job to build, test or deploy separately from the actual code being built, tested or deployed. This prevents users from applying their existing CI/CD best practices to the job configurations themselves.
With Jenkins pipeline plugin as I listed in should-have plugins, users can implement a project’s entire build-test-deploy pipeline in a Jenkins file and store that alongside their code.
Building on the core Jenkins value of extensibility, Pipeline is also extensible both by users with Pipeline Shared Libraries and by plugin developers.
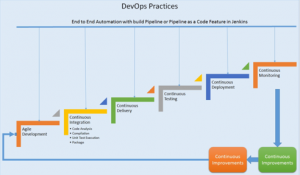
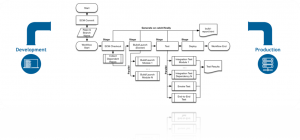
The flowchart below is an example of one CD scenario easily modeled in Jenkins Pipeline:
Pipeline syntax overview:
There are 2 kinds of pipeline code:
1.Declarative Pipeline (New concept):
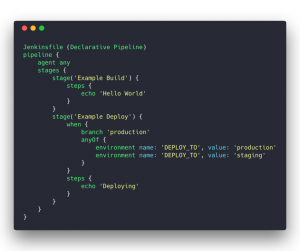
Declarative Pipeline replaces Groovy variable assignments, control structures, loops, and exception handling with a predefined structure and model to allow users of all experience levels to quickly create consistent, concise Pipelines without learning Groovy.
All valid Declarative Pipelines must be enclosed within a pipeline block
2.Scripted Pipeline (Advance):
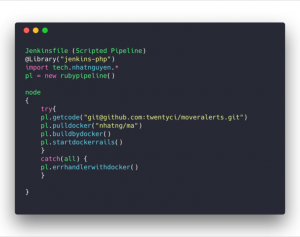
Scripted Pipeline, like Declarative Pipeline, is built on top of the underlying Pipeline sub-system. Unlike Declarative, Scripted Pipeline is effectively a general-purpose DSL built with Groovy. Most functionality provided by the Groovy language is made available to users of Scripted Pipeline, which means it can be a very expressive and flexible tool with which one can author continuous delivery pipelines.
In this article, I can’t give you a full introduction to Pipeline syntax. If you want to get deeper with this, this docs contains fully syntax and examples for both ways of pipeline code.
Jenkins in Actions
There are a lot of ways to approach Jenkins. You still can get your job done perfectly even you are using Web UI driven or Pipeline as Code. Base on your organization, projects, and skills, you can choose what is most suitable for yourself.
In this section, I’m introducing how did I implement CI/CD server for my organization.
1.Requirements:
a. Implement CI for automated build Laravel, Rails projects
b. PHP code should be following PS-R2 coding standard.
c. Execute e2e test written in Java
2.Actions
a. For building project, I prefer using docker container and execute bash script inside.
b. For checking Code quality, SonaQube is my best choice
c. Following requirements, I create a skeleton for the project:
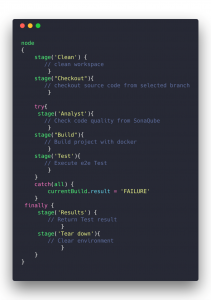
d. Then I filled up actions for each defined stage in Jenkins file for a Laravel project:
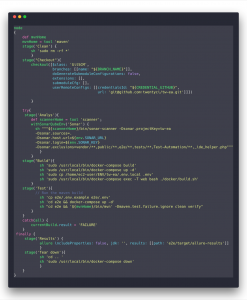
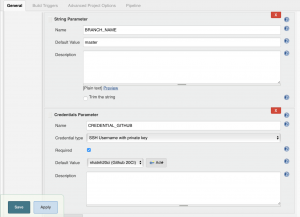
From these codes, we can see BRANCH_NAME and CREDENTIAL_GITHUB are input variable from Jenkins project, so we need to configure some more things:
3.Refactor
Let’s do some refactor for this:
Firstly, we need to implement this pipeline for more than one project, so reuse pipeline code and keep it D.R.Y should be a good way for saving development time.
The pipeline has supported for creating “Shared Libraries” which can be defined in external source control repositories and loaded into existing Pipelines.
a. Defining Shared Library structure:

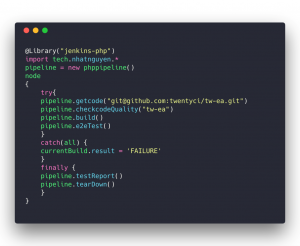
b. Phppipeline.groovy file:
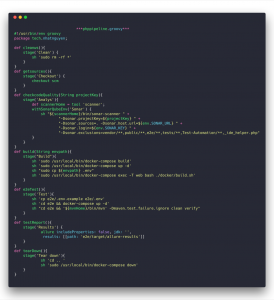
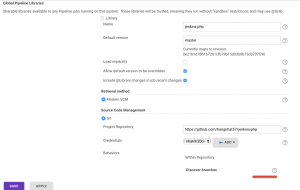
- To deploy shared library, we need to push pipeline code into a repository then go to Manage Jenkins and add new Global Pipeline Libraries.
- So now, the file for project become like this:
Conclusion
There are some important things that we should remember:
- Jenkins is automation server that used for implementing CI/CD following DevOps practice
- It has various plugins which help we can do our job simpler
- Jenkins pipeline as code help us to create and reuse pipeline for a group of projects
- Using Jenkins Shared library would save our time, keep our Jenkins code “DRY” and simpler
I hope that I’ve shown you the most common tasks for implementing CI/CD with Jenkins. Please feel free to leave your comments below if you have any question or contact us via email for free consultation. Don’t forget to share & subscribe to our blog!